Click the button to start reading
Resource Scheduling Methods, Guidelines & Strategies that Every Project Manager Needs to Know!
Have you ever had a client whose head is in the clouds? Maybe she wants a new porch, a hot tub and a brand new kitchen, all in under a few weeks.
Or has a client ever come to you in the middle of a complex project, asking you to speed things up and complete everything ahead of schedule?
Sometimes project management is about giving clients a reality check. Resource scheduling, particularly, gets down to the nitty gritty and carefully examines labor, materials and equipment to determine when something can really be completed, and at what cost.
At other times, you don’t have to pop their balloon and bring them back to planet earth. A few resource allocation tricks allow you to tweak and finesse a schedule, and deliver the seemingly impossible.
Interested in learning more? This post gets down to the basics of resource scheduling methods, including scheduling guidelines, hacks for busy project managers and more!

The Process of Developing a Resource Schedule
One central objective of a project’s planning stage is to create a schedule that really works, given all of the project’s constraints. “Really works” is key, but it’s also a challenge. In order to develop a viable schedule within the project’s scope, timeline and budget, planning is completed in stages, with resource scheduling coming near the end.
Let’s go over the steps for generating a reliable schedule, with a particular focus on where resource planning comes into the process.
1. The Assignment
During the initiation stage, a project manager receives the assignment, and is provided with a basic outline of its objective, timeline and budget.
This stage is about looking at the project in a broad sense. A feasibility study determines the project’s ROI and whether or not it makes sense to move forward. This study outlines the key resources required to achieve the objective.
2. Work Breakdown Structure
Once the project is green lit, the project manager puts his nose to the grindstone, scoping things out and laying a solid foundation. Primarily, he communicates with all stakeholders and gathers requirements.
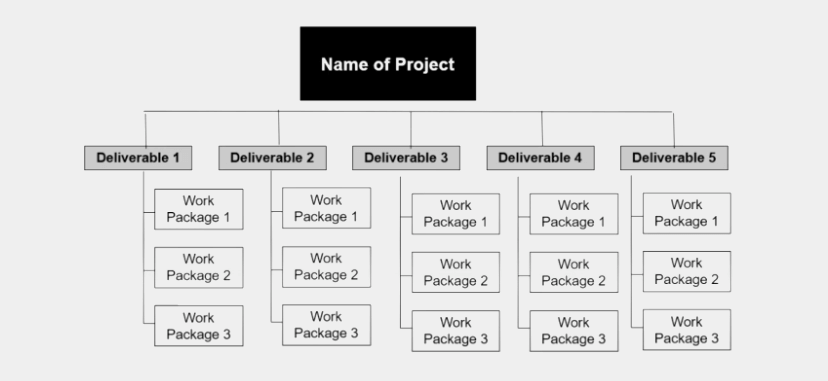
Using the overall objective and high level requirements, it’s possible to create a work breakdown structure (WBS), which separates the project down into increasingly smaller work packages. The WBS, in essence, outlines all of the work required in a project, and is a template for determining the resources needed.

3. Resource Breakdown Structure
The WBS segways right into creating a resource breakdown structure (RBS).
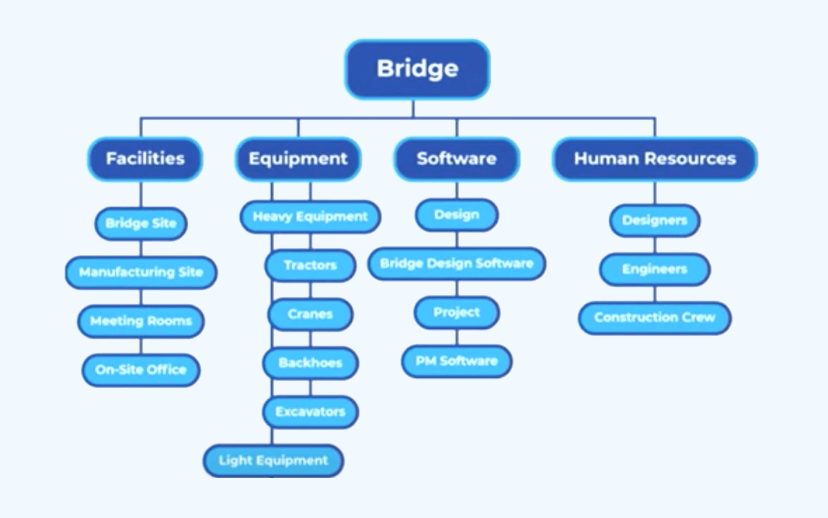
A resource breakdown structure examines all of the resources required to complete a project’s objective. Just like a work breakdown structure, it’s a hierarchical grid that starts with the project’s central objective. Rather than breaking things into work packages, however, the lower tiers examine the labor, equipment, materials and facilities required to complete each requirement.

The RBS is an excellent tool for outlining a project’s total resources. It’s used alongside the WBS to create a schedule.
4. Critical Path
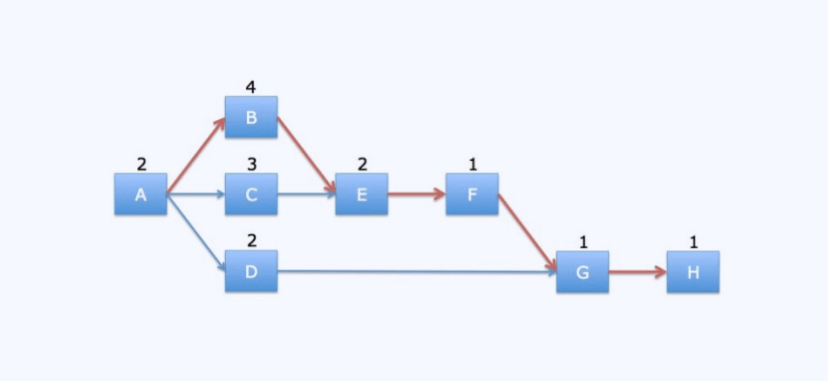
With all the work codified, the next step is arranging activities in a sequential order, and identifying interdependent activities. The critical path method looks at all the tasks in the lower tiers of the WBS, and plots them sequentially in a network diagram. This diagram arranges activities in relation to one another, carefully considering which must be performed ahead of others, and which activities can be completed at the same time.

A network diagram also identifies dependencies between tasks. A dependency is a relationship between two activities that determines when one activity can begin. For example, in the project of building a house, the drywall must be installed before the electricity is wired. As one of these tasks must be completed before the other, these two tasks are dependent.
This initial critical path is only preliminary, as it doesn’t consider resource constraints. These are considered in the following step.
5. Resource Allocation
Now it’s time to allocate resources. Completing the previous stages allows this stage to be completed with precision.
The preliminary network diagram, to some extent, is created in a fantasy land where multiple people can do multiple things at same time, people are multi-skilled and equipment, materials and supplies are in unlimited supply. A resource analysis adds some reality to the network diagram.
Resources are an umbrella for many aspects of a project. They include all laborers (salaried and hourly), the equipment used to create the deliverable, and the materials used within the final project. Resources even refer to facilities, such as office space and porta potties for construction projects.
Resources generally have a capacity, limit, or constraint. Take people for example. One person cannot do two tasks at the same time, nor can he perform tasks outside of his skill set. Labor may be limited by market conditions, as well. Or perhaps someone’s hourly rate won’t fit with the project’s budget.
Equipment and materials have their own respective constraints. One piece of equipment, generally, cannot work on two activities at the same time. And some materials are only available in certain amounts, or in certain seasons.
This scarcity plays a central role in resource scheduling. Resource allocation primarily is about identifying a resource’s constraints, and creating a schedule that works within them.
At this stage, the project manager utilizes several guidelines and strategies (discussed later in greater detail) to develop an efficient schedule that stays within the project’s budget, scope and timeline, and that also considers dependencies between activities and constraints on resources.
Resource scheduling can increase the critical path, and sometimes it increases the budget as well.
6. Schedule Creation
And finally, with allocation of resources, it’s possible to create a schedule. This schedule usually looks different from the initial critical path. Allocating resources usually means that certain activities have been rearranged, and other activities have been broken down, depending on resource availability. This is also the stage for creating a budget, as the amount and cost of required resources is clear.
Creating a dependable and sensible schedule is a logical and orderly process. Allocating resources and creating a final schedule comes toward the end of project planning, as it uses information gathered in the preliminary stages.

Guidelines for Resource Scheduling and Allocation
Consider these guidelines for best results when allocating resources.
Multi-Tasking Is a Myth
Generally speaking, we cannot do two things at the same time, unless one of the activities is passive, like listening to music or waiting for paint to dry.
Performing two tasks that both require cognitive skills at the same time in fact makes people less efficient, and work performance declines.
When scheduling resources, rule out assigning two tasks to the same person at the same time. Even though it might look efficient on paper, ultimately this leads to a decline in work performance and the project suffers.
Less Float Before More Float
When two activities with float need to be scheduled in sequence due to resource scarcity, schedule the activity with the least amount of float first. (Float is a measurement of an activity’s flexibility; for example an activity may have two days of float, or two weeks of float.)
For example, if Activity A has two weeks of float, and Activity B has only one, schedule Activity B before Activity A.
This principle prioritizes the more urgent tasks over the less urgent, and decreases the likelihood of a delay in the project’s overall completion.
More Resources Before Fewer Resources
In a similar vein, when two activities requiring unequal resources need to be scheduled in sequence, schedule the activity that uses more resources first.
For example, if the project is to design a website, and Activity A involves a software designer and a copywriter, and Activity B only involves the copywriter, schedule Activity A first.
This way, the more complicated tasks are completed right away. Complicated tasks, generally speaking, come with greater risks, so it’s best to complete them sooner and leave the simpler ones for later.
As we’ll get into next, resource scheduling is strategic, and following these best practices guidelines increases the likelihood that a project runs smoothly.

Resource Scheduling Methods & Strategies
If you’re pulling your hair out wondering how to meet a deadline, sometimes pulling a few tricks out of your hat makes everything come together like magic.
This section explains resource allocation and schedule compression techniques, both of which finesse and create efficiencies in a schedule. These techniques work best when they’re applied in the order listed below.
Resource Leveling
Resource leveling is an allocation technique that’s used when the demand for a resource exceeds the supply. This oftentimes occurs when two activities on the network diagram are scheduled in parallel, and both require the same resource. For example, say Activity A and Activity B are scheduled on a Wednesday, and they both require the same equipment. This scenario is impossible. Leveling out the schedule requires adjusting the network diagram so that activities A and B are in sequence, rather than parallel.
Resource leveling means having a reality check. It examines the schedule to see if it actually works, given the constraints of people, equipment and materials. This is an initial step when adjusting a resource schedule, and it often results in extending the project’s deadline.
Resource Smoothing
Resource smoothing is another allocation technique that is used after resource leveling. It re-allocates resources to create a more even distribution throughout a project.
For example, if the critical path schedules someone to work two twelve hour days, smoothing re-distributes the work over three or four days instead.
Smoothing only looks at activities with float and adjusts their start and finish times. (Float is an activity’s wiggle room, essentially.) Resource smoothing does not extend a schedule, that is to say. Rather, it works within the given schedule to create a reasonable workflow.
Smoothing doesn’t work in every scenario, but when it does, it’s a useful way to ensure work is performed moderately and consistently.
These two resource allocation techniques help to remove logjams and smooth wrinkles in a schedule. Once this is complete, the next step is to find ways to make the schedule more efficient. The following compression techniques play a central role.
Crashing
If a client asks you to speed up a project, and move the deadline ahead by a few weeks, this sometimes necessitates crashing the schedule.
Crashing is a schedule compression technique that adds more resources to shorten the time it takes to complete an activity. Oftentimes, this means increasing the cost in order to get something done faster.
For example, maybe a construction team is building a deck onto a house. It’s using two carpenters and is slated to last three weeks. By adding two additional carpenters, the project in theory can be completed in only a week and half!
Crashing doesn’t always work. The duration of some projects cannot be compressed by the addition of more resources. Take the deck example. Suppose that one part of the project entails staining the wood, and this takes four days to dry. This process cannot be sped up with the additional carpenters. Crashing doesn’t work at other times because the additional resources don’t work within the project’s budget.
When it does work, crashing is an ideal compression technique as it generally doesn’t add a whole lot of new risk to a project.
Fast tracking
Fast tracking, as the name suggests, is another technique for speeding up a project. It entails taking two sequential activities on a critical path and arranging them parallel to one another.
Consider a house remodel. Maybe the initial plan was to build a deck, then a fire pit and then an outdoor oven. Fast tracking builds all these at the same time.
Fast tracking may look like multitasking, but of course it doesn’t work in every scenario. First and foremost, it only works when the resources allow for it. Assigning the same person to build two things at the same time clearly won’t work. It also doesn’t work when two tasks have hard dependencies. This means that one task must be completed before another.
Fast tracking introduces risk to a project. Oftentimes two activities, without having hard dependencies, are best completed in sequence rather than in parallel. Changing the sequence may lead to re-work.
Fast tracking has more downsides than crashing, and so it should be used in moderation. However, when it’s the only possibility, it’s an effective way to shorten a project’s schedule.
All of these techniques play a key role in resource scheduling. Note that none of them changes the project’s scope. The same amount of work is completed in every instance.

Conclusion
Once you have a project, you know the tasks, and you have a WBS, the next step is to determine how it’s actually going to get done. Resource scheduling is about getting down to nitty gritty and creating a schedule that works within all the constraints of the project’s resources.
Sometimes it’s a bit of a reality check, similar to planning an extravagant vacation, and then looking inside your wallet. When you look at the hard facts, plans have a tendency to change.
Resource scheduling takes an orderly and logical approach to a project. Oftentimes, when the resources are all laid out, the critical path is adjusted and tweaked.
A remote team presents a special set of challenges to project planning. If you’re scheduling resources for a remote team, consider using Teamly, the project management software that makes scheduling and sharing workflows a cinch. Visit us and sign up today!


