Wheedling the Mules & Winning Buy-in: Change Management in Project Planning

Change Management in Project Management

Have you ever gone to your favorite diner, expecting your usual bacon, eggs, toast and coffee, and the same friendly banter with your favorite waiter, only to discover that they’d changed the menu and she’d up and quit?

This kind of upset is enough to throw off your entire day. We’re creatures of habit, and lean in on the familiar to create routines and structure our lives.

The workplace is no different. Once we’re settled into a software system and become familiar with a group of colleagues and clients, adapting to change feels like pulling a train off its tracks.

Yet, change chugs on relentlessly, particularly in this age of innovation and technology. Just to remain competitive, organizations constantly need to upgrade systems, improve products and adapt new software into its departments.

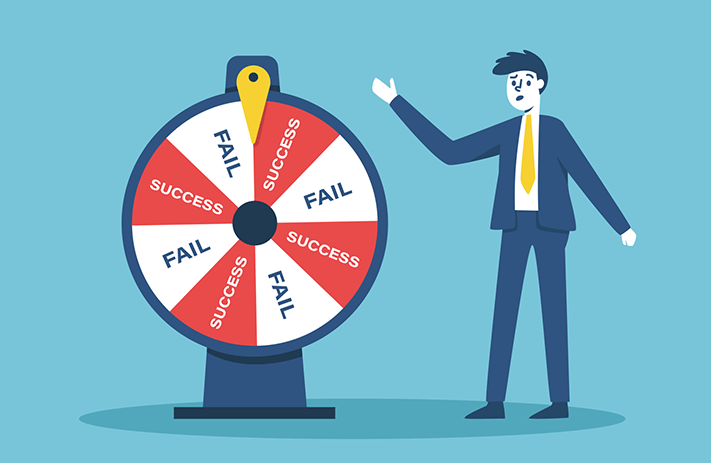
If you’re spearheading innovation, resistance to change poses the greatest obstacle to achieving growth. A successful rollout strengthens the culture, and means the company reaps the benefit of the change almost immediately, while an ineffective rollout weakens the culture and results in a stagnant state of zero growth.

Are you wondering how to launch change with success? How to cultivate evangelists who propagate and support a launch, and how to convert the saboteurs who work to derail changes in the workplace? A solution is well within reach, and that’s just what we’re coving in this post.

What is Change Management

A Definition of Change Management

Let’s start by clarifying just what “change management” means.

According to Project Management PSI, change management is the “process, tools and techniques to manage the people side of change to achieve the required desired business outcome. Change management incorporates the organizational tools that can be utilized to help individuals make successful personal transitions resulting in the adoption of and realization of change.”

At its essence, change management isn’t about rolling out a new system, or moving an office across town. Rather, it’s about achieving the personal transition that empowers people to adopt changes in the workplace. Its focus is on bringing individuals from a current state into a future state.

Changes come in all shapes and sizes. They can be practical, such as moving to a new office or changing office hours. Some changes are technical, such as introducing new software or upgrading systems from manual to automatic. Some changes introduce new product lines and business strategies.

While for some people, a change presents a minor speed bump in the work journey, for others the same change presents a massive, nearly impassable roadblock.

In order to bring individuals past this roadblock, a change cannot be implemented hastily or cursorily. Rather, it needs the full attention of the leadership and a change practitioner. A successful rollout requires strategy and a deliberate plan. Let’s look at some key components to a successful change management plan.

The 5 Stages of a Change Management Plan

The 5 Stages of a Change Management Plan

When an organization strategizes the rollout of a big change, it’s way more likely to reap the benefits of the change. Rather than fizzle and fall flat, the change empowers individuals and strengthens the company culture.

So what does a strong change management plan entail? Here are the five stages of a successful one.

1. Identify and Communicate the “Why”

Any successful rollout requires buy-in from all the individuals involved. When someone understands the rationale behind a change, and agrees it’s best for the company, he is willing to switch out of autopilot and consciously engage in integrating the change into the company.

How does an organization persuasively communicate the “why”? Generally, a trusted leader plays a pivotal role at this initial stage. Speaking to the audience in their language and articulating how the change benefits them inspires people to get on board.

When determining the approach of these initial communications, consider the culture of the company and its workforce. Are they conformist or individualist? Artistic or technical? Adopting the language to their sensibilities makes the message more receptive.

Also, it can be effective to create buzz in the office around the new tool or innovation several weeks in advance, through hints dropped at meetings or in company emails.

2. Cultivate Desire and Enthusiasm

We’re always telling ourselves a story. And if a change practitioner doesn’t develop and communicate the story behind the change, people create a story, one which may make the change difficult.

The story can make or break the rollout of a change. An aspirational story that invigorates and inspires the team is sure to cultivate evangelists and champions. A confused or muddled story, or one that doesn’t emphasize how the change benefits individuals, is sure to create saboteurs who resist the change.

Disseminating the story not only entails shaping the right message, but also utilizing the right tools. Swag with the story’s key message adds an air of festivity to the change. In a distributed team, tools such as webinars, interactive white boards, meetings and emails all serve to communicate the message.

At this stage, getting upper management on board is key. This allows managers to communicate the benefits of the change directly to employees. Transparency; being clear about the necessity of the change; also increases trust from the team.

3. Train the Team

This is one of the more obvious steps to implementing a change. So clear, in fact, that many change practitioners are inclined to skip the first two stages and jump right to training. However, the first two stages put individuals into the right frame of mind, making them more receptive to training.

During training, people want to understand how their role and responsibilities are impacted by the change. Even a practical transition like moving offices entails significant changes, such as a new key card, a new mailing address, and a new layout to the office.

There are many practicalities to consider with training, including identifying who needs to be trained, developing training resources, gathering the necessary equipment (projectors, whiteboards, screens) and allocating resources for reserving a space.

Reinforcing the learning with interactive quizzes, and singling out “change champions” encourages everyone to excel and helps the leaning “stick.”

4. Implement the Change

Perhaps this stage is self-explanatory. It’s always nice to accompany the implementation of a big change with some fanfare and celebration. This generates enthusiasm and a collaborative spirit that gets people on board.

5. Monitor and Reinforce

A change management plan doesn’t end with the rollout. It’s critical to monitor the change to see how things are going. Establishing feedback loops helps to identify pain points.

Be on the lookout for resistance, and have a plan in place to navigate it, as it’s certain to surface.

In sum, these five steps offer a framework for approaching an institutional change with a strategy and a plan. When executed thoughtfully and diligently, a plan allows for a smooth rollout with few challenges.

Success in Change Management

4 Tips for Success in Change Management

A change management plan makes the difference between whether or not a software system is adapted, or whether or not employees get on board with a new business strategy. Let’s cover some tips for creating a top-notch plan that’s sure to succeed.

1. Identify Who’s Impacted

Not everyone is impacted similarly with a big change. Some people’s workdays are entirely upended, while others are hardly affected at all. Consider the adoption of new accounting software, for example. The finance and accounting departments are faced with a huge learning curve, while the IT department may not even notice a ripple.

Focus the change management plan on those individuals who are most impacted. Take measures to cushion their transition, to provide them additional support, and to give them allowances during the transition phase.

2. Communicate “What’s in It For Me” (WIFM)

Cultivating desire and enthusiasm behind a change is all about helping people understand how the change benefits them personally.

When people understand that the change isn’t about “achieving growth” in the abstract, but about improving their own work environment and providing them with growth opportunities, they’re far more willing to get past the growing pains and adopt the change into their routines.

3. Plan for Resistance

Individuals impacted by a change generally fall into four categories: the agnostics who don’t care about the change, the evangelists who support it, the dreamers who aren’t aware of it and finally the saboteurs who actively work against the change.

This final category, the saboteur, clearly poses the greatest obstacle to success. A good plan, then, includes strategies for identifying and converting these people.

Listening is key to a “saboteur strategy.” Speaking one-on-one and listening to their concerns, emphatically, creates an open communication channel. Appreciate how the change impacts their workday, and do what you can to ease the pain.

If someone continues to resist the change, it may be necessary to escalate the issue to higher management.

4. Navigate the Transition Phase

A change is about going from a current state into a future state. However, a third state is integral to the process: the “in between” stage.

Rather than simply going live, a successful plan anticipates a transition stage. Some people need quite some time to adapt to a new software system, for example, even after a week of training. Allowing for adjustments and bumps in the road eases people’s struggles with the change.

Conclusion

Change is constant. As a philosopher once said, “You never set your foot in the same river twice.”

However, change is also a huge challenge. We’re all inclined to prefer the familiar and the routine.

A successful change management plan focuses on individuals. It communicates how the change benefits them, guides them over roadblocks and addresses their concerns. A good plan allows the organization and individuals to reap the benefits of the change more readily.

What’s your #1 tip to implementing a successful change management plan?

Top 15 Leadership Goals You Should Set For Yourself

Goals as a Leader

If you want to be effective, you have to set leadership goals.

In fact, that’s what separates the best leaders from the rest. They don’t just go with the flow–they have a clear vision and they’re always working towards achieving it.

So, what kind of goals should you set for yourself if you want to be a strong leader?

In this blog post, we’ll explore what kind of goals leaders should set in order to be effective.

Types of Goals

The Three Types of Goals Every Leader Should Set

Broadly speaking, leadership goals fall into three categories:

  1. Organization-Level Goals
  2. Department-Level Goals
  3. Individual-Level Goals

Organization-Level Goals

The first type of goal you should set for your organization should be an organization-level goal.

This is a goal that benefits the entire organization, not just a specific department or individual.

Organization-level goals could include increasing profits, expanding into new markets, or improving customer satisfaction.

Department-Level Goals

The second type of goal you should set is a department-level goal.

As the name implies, department-level goals are designed to benefit a specific department within the organization.

For example, a goal for the marketing department might be to increase brand awareness.

A goal for the human resources department might be to reduce turnover.

Individual-Level Goals

The third and final type of goal to consider is an individual-level goal.

Individual-level goals are designed to benefit a specific individual within the organization.

They are often used to help employees develop their skills and knowledge so that they can contribute more effectively to the organization.

For example, an individual-level goal might be to complete a leadership development program or earn a certain certification.

Benefits of Setting Effective Goals

The Benefits of Setting Effective Goals

There are many benefits to setting effective goals as a leader. Some of the most notable benefits include:

  • Helps to Clarify Purpose
  • Facilitates Planning
  • Encourages Action
  • Increases Motivation
  • Improves Performance
  • Creates a Sense of Accountability
  • Promotes Collaboration
  • Builds Trust
  • Strengthens relationships
  • Helps leaders stay focused

The Top 15 Goals The Best Leaders Set For Themselves

Now that we’ve covered the different types of goals you should set, it’s time to dive into some specific goals for you to aim for.

Here are 15 goals that every leader should set for themselves:

Automate and Delegate Tasks

1. Automate and Delegate

When you first start out as a leader, the temptation is for you to do everything yourself.

It’s easy to think that if you’re not involved in every task, it won’t get done right.

This is a recipe for disaster.

Not only will you quickly become overwhelmed, but you’ll also stifle creativity and innovation.

The key is to automate as much as possible and delegate the rest.

By automating, you can free up your time to focus on more important tasks. And by delegating, you can give others the opportunity to show what they’re capable of.

2. Get Acquainted with other Leaders in your Industry

No leader is an island.

To be successful you need teachers, mentors, and peers.

One of the best ways to find these people is to get acquainted with other leaders in your industry.

You can do this by attending industry events, reading books and articles written by other leaders, or following them on social media.

Why is this so important?

Because when leaders have a strong network, they can tap into this network for advice, mentorship, and even business opportunities.

Constructive Criticism

3. Learn How to Accept Constructive Criticism

Nobody likes to be told they’re doing something wrong.

But if you want to improve as a leader, you need to be open to constructive criticism. Not all criticism is worth taking to heart.

But if you can learn to identify the criticism that will help you improve, you’ll be well on your way to becoming a better leader.

4. Develop a Thick Skin

In a similar vein, it’s important for leaders to develop a thick skin.

This doesn’t mean you should ignore criticism altogether. But it does mean that you shouldn’t take everything personally.

There will always be people who don’t like you or your ideas. And that’s okay. Maybe you remind them of a bad boss they had in the past. Or maybe they’re just jealous of your success.

Either way, it’s not worth letting these people get under your skin.

5. Be Decisive

Leaders need to be decisive. Indecision is a sign of weakness and will only lead to more problems down the road.

Of course, being decisive doesn’t mean you should always go with your gut. There are times when it’s important to take your time and weigh all the options.

But in general, leaders need to be able to make quick decisions and stick to them.

Note: This will take some time and experience to hone in.

6. Be Flexible

While it’s important to be decisive, leaders also need to be flexible. Things change all the time and leaders need to be able to adapt.

If you’re too rigid, you’ll quickly become obsolete. But if you’re too flexible, you’ll have a hard time making progress.

The key is to find the right balance.

Master Plan

7. Create a Master Plan

A leader without a plan is like a ship without a rudder. You need to know where you’re going and how you’re going to get there.

The best way to do this is to create a master plan.

Your master plan should include your long-term goals, your strategy for achieving those goals, and a timeline for each goal.

By having a plan, you’ll be able to stay focused and make better use of your time.

8. Set Priorities

In addition to setting goals, it’s also important to set priorities.

Your priorities will change over time, and they will shift depending on the situation. But it’s important to always have a clear understanding of what your priorities are.

If you don’t, you’ll find yourself pulled in too many different directions and you won’t be able to make any real progress.

Priorities can be discovered by paying attention to your values.

9. Go on the Search for Your Passion

If you haven’t found your passion yet, now is the time to go on the search for it. Your passion is what will drive you to be successful.

It’s what will give you the motivation to keep going when things get tough.

And it’s what will make you a better leader.

It might not be super huge and earth-shattering. It could be something as simple as making people smile, numbers, or organizing things.

Whatever it is, lean in to it and let it guide you on your journey to becoming a great leader.

Hire and Train Top Talent

10. Hire and Train Top Talent

Talent is one of the most important assets a leader can have on their team.

Unfortunately, it can be very difficult to find.

When leaders do find top talent, they need to do everything they can to keep them on their team.

This means offering competitive salaries and benefits, providing opportunities for professional development, and creating a positive work environment.

It’s also important for leaders to invest in their team’s development.

This could involve sending them to training courses, providing mentorship, or simply giving them opportunities to grow within the company.

Now if you’re part of a start up, the budget for this may not be readily available so get creative. internships, oversea talent programs, or even looking for remote talent are all great ways to get around this.

Effective Communication

11. Communicate Effectively

If you have a plan. If you have passion. If you have top talent on your team. The only way any of that will matter is if you’re able to communicate effectively.

Leaders need to be able to share their vision in a way that inspires others to follow them.

They need to be able to give clear instructions and provide feedback that is both positive and constructive.

And they need to be able to do all of this in a way that is respectful and professional.

12. Pay Attention to Momentum

Momentum is the engine that drives your team forward. It’s what keeps your team going when things get tough.

As a leader, it’s your job to pay attention to all momentum – both the positive and negative types.

If you see momentum starting to build, it’s your job to capitalize on it and keep it going.

On the other hand, if you see momentum beginning to stall, it’s your job to figure out why and get things moving again.

This is true for you and your own internal drive too. As a leader, you need to be aware of when you’re starting to lose steam so that you can recharge your batteries and get back to work.

Stay Focused

13. Stay Focused

The ability to stay focused is essential for any leader. There will always be distractions and things that try to pull you off course.

But if you want to be successful, you need to learn how to ignore them and stay focused on what’s important. One way to do this is to set weekly or daily goals.

This will help you stay on track and make sure you’re making progress.

It’s also important to take breaks when you need them. This will help you stay fresh and avoid burnout.

14. Daily Reflection

Leadership is a journey, not a destination. And like any journey, it’s important to reflect on your progress along the way.

One way to do this is to keep a daily journal. This doesn’t have to be anything fancy.

Just write down what you did each day and how it made you feel.

Over time, you’ll start to see patterns emerge. This will help you identify your strengths and weaknesses so that you can continue to grow as a leader.

15. Seek Feedback And Truth At All Cost

No leader is perfect. We all have room for improvement. The only way to know where you need to improve is to seek feedback from those around you.

This can be difficult, but it’s essential if you want to continue growing as a leader.

It’s also important to seek the truth, even when it’s unpleasant. This will help you make better decisions and avoid making mistakes.

The bottom line is that leadership is a journey. It’s not something that you achieve overnight.

It takes time, effort, and a lot of hard work. But if you’re willing to put in the work, you can be a great leader. Just remember to set goals, communicate effectively, stay focused, and always seek feedback and truth.

Commandments goal setting

The 10 Commandments goal setting

Here’s a list of 10 commandments that will help you set great goals and achieve success as a leader:

Commandment #1 – Set realistic goals.

  • Goals are pointless if they’re not achievable.
  • You need to set goals that challenge you but are still within the realm of possibility.

Commandment #2 – Set specific goals.

  • Vague goals are impossible to achieve.
  • Be as specific as possible when you’re setting goals.
  • The more specific you are, the easier it will be to take action and achieve your goals.

Commandment #3 – Set measurable goals.

  • If you can’t measure your goal, you won’t be able to tell if you’ve achieved it.
  • Make sure your goals are quantifiable so that you can track your progress.

Commandment #4 – Set time-bound goals.

  • Goals need to have a deadline.
  • If you don’t set a deadline, you’ll never feel the urgency to take action and achieve your goal.

Commandment #5 – Set challenging goals.

  • If your goals are too easy, you won’t be motivated to achieve them. On the other hand, if your goals are too difficult, you’ll get discouraged and give up.
  • The key is to find the sweet spot by setting goals that are just challenging enough to push you outside your comfort zone.

Commandment #6 – Be clear about what you want to achieve.

  • The more clear you are about your goals, the easier it will be to achieve them.
  • Make sure you have a crystal-clear vision of what you want to achieve before you take action.

Commandment #7 – Align goals with your company’s mission and values.

  • Your goal should be something that supports your company’s mission and values.
  • If it’s not, you’ll likely have a hard time achieving it.

Commandment #8 – Be prepared to adjust your goals as needed.

  • As you work towards your goal, you may realize that it’s not realistic or achievable.
  • If this happens, be prepared to adjust your goals.

Commandment #9 – Celebrate progress along the way.

  • Celebration keeps momentum up.
  • To celebrate means an acknowledgement that you are on the right track.
  • When you take time to celebrate your progress, it helps you stay motivated and focused on your goal.

Commandment #10 – Keep your team focused on the goal.

  • As a leader, it’s your job to keep your team focused on the goal.
  • This means regularly communicating the goal to your team, checking in on their progress, and providing support when needed.

Summary

Setting effective goals is one of the most important skills a leader can possess. By setting goals that are inspirational, strategic, and tactical, you can ensure that your team has the motivation and direction necessary to achieve success.

By following the tips in this article, you can set effective goals that will benefit both you and your organization.

What’s important is that you take the time to set goals that are specific, measurable, achievable, relevant, and time-bound. If you do this, you’ll be well on your way to achieving success as a leader.

When it comes to leadership goal setting, the sky’s the limit. So dream big and set goals that challenge you. With hard work and dedication, you can achieve anything you set your mind to.

Getting Started with Bottom Up Estimating – Your Essential Guide

Bottom Up Estimating in Project Management

If you’re a project manager, then you know that estimating the cost is essential to the success of any project.

After all, how can you plan and budget for a project if you don’t have a good sense of how much it’s going to cost?

There are a number of different methods that project managers can use to estimate the cost of a project, but in this blog post, we’re going to focus on one in particular: bottom up estimating.

What is Bottom Up Estimating

DEFINED – Bottom Up Estimating

Bottom up estimating is a technique that involves breaking down the work required for a project into smaller, more manageable pieces—known as work packages—and then estimating the cost of each individual work package.

This type of estimate is usually more accurate than other types (such as top-down estimating), but it can be more time-consuming and resource-intensive.

Still, if done correctly, bottom up estimating can give you a much better sense of the true cost of your project—which is why we recommend it.

5 Amazing Benefits of Bottom Up Estimating

Now that we’ve explained the basics of bottom up estimating, let’s take a moment to discuss some of the reasons why you might want to use this type of estimate for your next project.

Benefit #1 – It’s Accurate.

No doubt about it, bottom up estimating is more accurate than top down estimating.

Since you’re breaking the project down into smaller pieces and then estimating the cost of each individual piece, you’re able to account for all the small details and unknowns that can often make top down estimates inaccurate.

Benefit #2 – It Leads to More Efficiency

Another advantage of bottom up estimating is that it often leads to more efficiency. That’s because you’re able to identify inefficiencies early on and then address them before they become a bigger problem.

Benefit #3 – It Forces You To Pay Attention To Detail

As we mentioned before, bottom up estimating is more resource-intensive than top down estimating.

But that’s not necessarily a bad thing. In fact, some people would argue that it’s actually a good thing.

That’s because this type of estimate forces you to pay attention to detail—which can only be a good thing for your project.

Benefit #4 – It Can Help You Make Better Decisions

Bottom up estimating can also help you make better decisions. That’s because you’re able to see the big picture and the small details at the same time.

This type of estimate gives you a complete view of your project—which can be very helpful when it comes time to make decisions.

Benefit #5 – It’s Flexible

Finally, bottom up estimating is flexible. That’s because you can adjust the level of detail (i.e., the number of work packages) to fit your needs.

If you need a more accurate estimate, you can break the project down into more work packages.

Or if you need a quick estimate, you can break the project down into fewer work packages.

The bottom line is that bottom up estimating is a very versatile tool—and one that every project manager should have in their toolkit.

Bottom Up Estimating Cons

Cons of Bottom Up Estimating

While bottom up estimating has many advantages, it’s not without its drawbacks. In this section, we’ll discuss some of the main drawbacks of using this type of estimate.

CON #1 – It’s Time-Consuming

Do you remember the old adage, “good things come to those who wait?” Well, that’s definitely true when it comes to bottom up estimating.

This type of estimate can be very time-consuming—especially if you’re working on a large project. That’s because you need to take the time to break the project down into smaller work packages and then estimate the cost of each individual work package.

So if you’re working on a tight deadline, bottom up estimating might not be the best option.

CON #2 – It’s Resource-Intensive

As we mentioned before, bottom up estimating is more resource-intensive than top down estimating. That’s because you need to have a good understanding of the project in order to break it down into smaller pieces.

Still, we believe that the benefits of bottom up estimating outweigh the drawbacks. And in the next section, we’ll lay out several benefits in more detail.

CON #3 – It’s Not Always Necessary

Another drawback of bottom up estimating is that it’s not always necessary. In some cases, top down estimating might be just as effective—and a lot less time-consuming.

So before you invest the time and resources into bottom up estimating, make sure it’s really necessary for your project.

When to Use Bottom Up Estimating

When to Use Bottom Up Estimating

Now that we’ve discussed some of the advantages and disadvantages of bottom up estimating, you might be wondering when to use this type of estimate.

In general, we recommend using bottom up estimating when accuracy is more important than speed. That’s because bottom up estimating can be very accurate—but it’s also very time-consuming.

So if you need a quick estimate, top down estimating might be a better option. But if you need a more accurate estimate, bottom up estimating is probably the way to go.

How to Do Bottom Up Estimating: A Step-By-Step Guide

Now that we’ve talked about what bottom up estimating is and why it’s so useful, let’s take a look at how to actually do it. Here are the steps you’ll need to follow:

STEP 1 – Break down your project into smaller work packages.

Big chunks of work can be overwhelming—and difficult to estimate. That’s why the first step in bottom up estimating is to break your project down into smaller work packages.

How? Start by identifying all of the tasks that need to be completed in order to finish your project. Then, group these tasks into smaller work packages.

For example, let’s say you’re working on a website redesign. Some of the tasks you’ll need to complete include wireframing, designing, and coding. These could be grouped into three different work packages:

Wireframing: This work package includes all of the tasks related to creating the wireframes for the new website.

Designing: This work package includes all of the tasks related to designing the new website.

Coding: This work package includes all of the tasks related to coding the new website.

STEP 2 – Create a work breakdown structure.

Once you’ve identified all of the work packages for your project, it’s time to create a work breakdown structure (WBS).

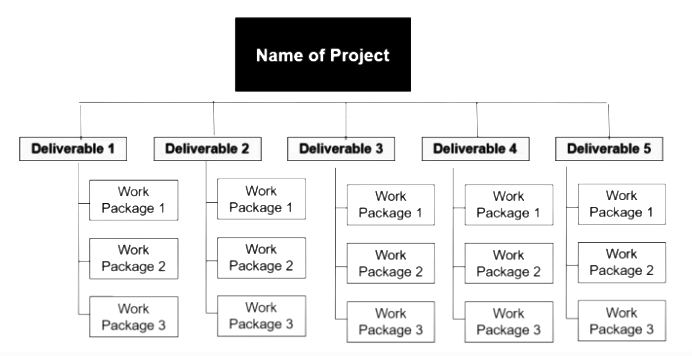
A WBS is a tool that helps you to organize and track the progress of your project. It’s basically a hierarchy of all the work that needs to be done, from the highest level (the project itself) down to the lowest level (individual tasks).

EXAMPLE

Here’s an example of what a WBS might look like for our website redesign project:

I. Website Redesign Project
A. Wireframing
1.) Wireframe 1 -> Page 1 – Homepage
2.) Wireframe 2 -> Page 2 – About Us
3.) Wireframe 3 -> Page 3 – Contact Us

B. Designing
1.) Design 1 -> Page 1 – Homepage
2.) Design 2 -> Page 2 – About Us
3.) Design 3 -> Page 3 – Contact Us

C. Coding
1.) Code 1 -> Page 1 – Homepage
2.) Code 2 -> Page 2 – About Us
3.) Code 3 -> Page 3 – Contact Us

As you can see, the WBS is organized into three levels. The first level is the project itself (website redesign). The second level is the work packages (wireframing, designing, and coding). And the third level is the individual tasks (wireframe 1, wireframe 2, etc.).

Estimate the effort required for each task.

STEP 3 – Estimate the effort required for each task.

Now that you have your project broken down into smaller work packages, it’s time to start estimating the effort required for each task.

To do this, you’ll need to consult with the people who will be doing the work. Ask them how long they think it will take to complete each task.

For example, if you’re estimating the time required to design a new homepage, you might ask the designer how long it will take them to create the design. They might say it will take 8 hours.

Once you have an estimate for each task, you can then add up all of the estimates to get an estimate for the work package as a whole.

So, using our example from above, if the design work for the homepage will take 8 hours, and the design work for the About Us page will take 6 hours, then the total estimated effort for the Designing work package will be 14 hours.

STEP 4 – Add up all of the estimates to get an estimate for the entire project.

Once you’ve estimated the effort required for each task, you can then add up all of the estimates to get an estimate for the entire project.

Again, using our example from above, if the total estimated effort for the Wireframe work package is 20 hours, and the total estimated effort for the Designing work package is 14 hours, and the total estimated effort for the Coding work package is 10 hours, then the total estimated effort for the entire project will be 44 hours.

STEP 5 – Add a contingency to account for uncertainty.

As with any estimate, there’s always going to be some uncertainty. Things might take longer than expected, or there might be unforeseen problems that arise.

To account for this, you’ll need to add a contingency to your estimate. A contingency is an amount of time (or money) that’s set aside to deal with unexpected problems.

For example, you might decide to add 10% to your total estimated effort as a contingency. So, using our example from above, the total estimated effort for the project would now be 44 hours + 10% contingency, or 48.4 hours.

The amount of contingency you add will depend on the level of uncertainty surrounding the project. If there’s a lot of uncertainty, you might want to add a larger contingency. If there’s relatively little uncertainty, you might be able to get away with a smaller contingency.

Once you’ve added a contingency, you should have a good estimate for the total effort required to complete the project.

Bottom Up Estimating

Conclusion

Bottom Up Estimating is a great way to get an accurate estimate for your project. By breaking down the project into smaller tasks, and then estimating the effort required for each task, you can get a good sense for how much work and money is involved.

Learning to Roll with It: Wave Planning in Project Management

Rolling Wave Planning in Project Management

Do you ever decide to take a trip, and suddenly find yourself thinking through every detail, right down to where you’re going to eat meals and what toiletries to pack in your suitcase?

It’s easy to get ahead of ourselves sometimes.

As the Birds sang in their #1 Hit back in 1965, “to everything there is a season.” There’s a time to make broad sweeping generalized plans, and a time to get down into the nitty-gritty.

As a project manager, you probably dread giving vague, evasive answers to clients when they ask about timelines and deliverables. It makes you sound mushy and unreliable. You want to be on top of your game, rather, and promise the client certainty around delivery dates and milestones.

The funny thing about projects, however, is that over-planning can actually lead to mediocre outcomes.

Learning to be open to uncertainty, and to answer questions with the phrase “I don’t know yet” is key to reducing risk and improving outcomes in project management.

In fact, project management even has systems developed around this idea. One is known as rolling wave planning. Want to learn more about it and how to apply to your projects? Then stay tuned, cause that’s what we’re covering in this post.

Rolling Wave Planning Defined

Rolling Wave Planning Defined

Rolling wave planning entails approaching a project in successive stages, from larger to smaller time frames. With each graduation, the planning becomes increasingly detailed and specified.

Here is the definition from the Project Management Body of Knowledge Guide, Sixth Edition:

“Rolling wave planning is an iterative planning technique in which the work to be accomplished in the near term is planned in detail, while work further in the future is planned at a higher level.”

Let’s look at what this definition looks like in real life.

Step 1: The Big Picture

Imagine you’re assigned a big project that’s slated to last 18 months or more. The key information you have at this point is the project objective, timeline and budget.

Before the project begins, your task is to assess the entire project with a broad overview. You may have notes from a similar project from the past to assist in creating benchmarks around project stages and their duration.

The objective, essentially, is to create a big-picture sketch.

Step 2: The Stage Planning

During the project, as each stage comes onto the horizon, it’s possible to plan out the details with greater specificity.

This more scrutinized planning may well cause adjustments to things like the timeline, deliverables, and the budget.

Step 3: The Nitty-Gritty

After it’s been determined what’s to be accomplished during one stage of a project, it’s then possible to map things out in even greater detail.

Let’s say one stage is forecasted to last three weeks. As each week approaches, the project manager can create a work breakdown structure to plot the sequence of all the tasks for that week.

Depending on the nature of the work, you may want to break work down even further into daily work plans.

Rolling Wave Planning

As you can see, with rolling wave planning you don’t create one master plan, then dust off your hands and be done with it. Planning happens throughout. The plan is consistently re-evaluated and updated. These various stages of planning look like a series of rolling waves.

It’s very difficult to plan anything three years in advance. Breaking it down into successively smaller bite sized chunks, and looking just one month out is much easier.

Sometimes the planning levels are referred to as Schedule Levels 1, 2 and 3. You may even have a Schedule Level 4 or 5 if this level of detail makes sense for the project.

This form of planning is very similar to agile, and it’s popular in construction projects, and any project really that requires continual changes and adjustments.

Examples of Rolling Wave Planning

Examples of Rolling Wave Planning

We use rolling wave planning in our lives all the time. At some level, it’s intuitive. Let’s look at three scenarios we might encounter in our lives, and consider the certainties and uncertainties for each of them.

A Short-Term Plan

Let’s say you’re planning a weekend bonfire at your home, and it’s just a few days out.

Certainties: The date, the time, the location, the decorations, and a list of people who plan to come.

Uncertainties: The food each person plans to bring, and the music you’ll play at the party.

A Mid-term Plan

Now, let’s say you have a weekend ski trip planned for the upcoming month.

Certainties: The dates, the ski resort and the place you plan to stay.

Uncertainties: The items in your suitcase and the restaurants you’ll dine at for meals.

A Long-Term Plan

Finally, let’s consider a vacation you have planned six months from now.

Certainties: The location of the vacation spot.

Uncertainties: The duration of the trip, the mode of travel (plane or car), the accommodations, the people who are coming on the vacation with you.

As you can see, rolling wave planning is about looking more closely at a plan as things come into view. With each smaller time frame, the plans become more and more specific.

Rolling Wave Planning Benefits

The Benefits of Rolling Wave Planning

Why do project managers utilize rolling wave planning?

One way to appreciate the benefits of this method is to imagine the alternative.

Take a family vacation that’s eight months out. What if you purchased plane tickets, reserved a hotel room, and packed your suitcase with all of your favorite clothes when the vacation is still a half year away?

It’s not difficult to see that this planning could lead to a headache later on. Your work schedule could change during the upcoming months, forcing you to adjust the dates. And you certainly will find yourself digging into your suitcase for some of your favorite t-shirts and jeans.

All of the initial planning was wasted energy.

This silly example demonstrates that many details simply cannot be determined at the start. If you have an 18-month project, it’s tempting to feign certainty and plot everything out on a gantt chart. But from that far out, granular planning is worthless, as so much is certain to change.

Now, let’s look at three clear benefits of rolling wave planning

Saves Time (No Rework)

If you adopt a “we’ll cross that bridge when we come to it” mantra to project planning, then you do the planning when it’s going to be effective and certain. You can even pull out a gantt chart at this point and it should be reliable.

Whereas if you plan things from too far out, you still don’t know enough about how things are going to roll out to determine the small details.

Reduces Risk

Rolling wave planning increases uncertainty. For example, a project manager using this system openly acknowledges that he or she doesn’t know the details of stage 3 during the middle of stage 1.

However, it reduces risk. A simple definition of risk is that it’s uncertainties that matter. A risk management plan looks at the probability of these uncertainties.

When planning takes place around the actual time these risks might surface, it’s much easier to identify all of the threats and vulnerabilities posed to certain assets, and then put a solid plan in place to either mitigate, avoid, transfer or accept them.

Take a construction project, for example. Inclement weather always poses some level of risk. However, you have no idea of weather patterns at the beginning of an 18-month project. You could find yourself taking all sorts of precautions against something that never happens. Rolling wave planning waits to plan for this risk within a 1-2 week time frame.

Allows for Change

One of the greatest benefits of rolling wave planning is that it allows for changes to occur during a project. Sometimes it’s impossible to know at the onset what a final deliverable may look like, even with a clear set of requirements. Developments during the project, new knowledge and the manifestation of risks serve to alter the final outcome.

When a project manager waits for these bends and curves and is poised to adapt and pivot, it ultimately serves to create a deliverable that solves the client’s problem or meets their needs.

As you can see, rolling wave planning benefits a project in several key ways.

However, the nature of a project determines the level of uncertainty it’s able to assume.

Some projects can have a lot of uncertainty at the beginning, as changes and pivots may not pose a huge risk. However, other projects must lay out clear definite plans at the beginning, as the cost to make changes would be enormous. And so the degree to which a project manager adapts rolling wave planning into a project depends on the nature of the project.

Tools and Methods for Using Rolling Wave Planning

Tools and Methods for Using Rolling Wave Planning

Rolling wave planning means bringing people together at key pivotal moments and creating space to look at all aspects of a project, including risks, issues, constraints, the scope, and any upcoming decisions to make.

Successfully incorporating this method into a project requires a few tools and strategies.

Scrum Ceremonies

Scrum Ceremonies

The agile method known as scrum has several ceremonies that help to utilize rolling wave planning. They can be adopted by any team.

The first is a sprint planning session. During this session, a team looks at the next small stage (Schedule 3 level), and plots out a specific amount of work for the team to accomplish.

Another is a retrospective. This takes place at the end of a sprint. At a retrospective, the team reflects on the sprint and how everyone worked together, and identifies any improvements to make for the next go-around.

Finally, a daily scrum meeting allows the team to air concerns, identify any significant changes or risks as they surface.

Taken together, these three processes create a system of communication that allows for the on-going planning that’s integral to rolling wave planning.

Gantt Charts

Gantt Charts

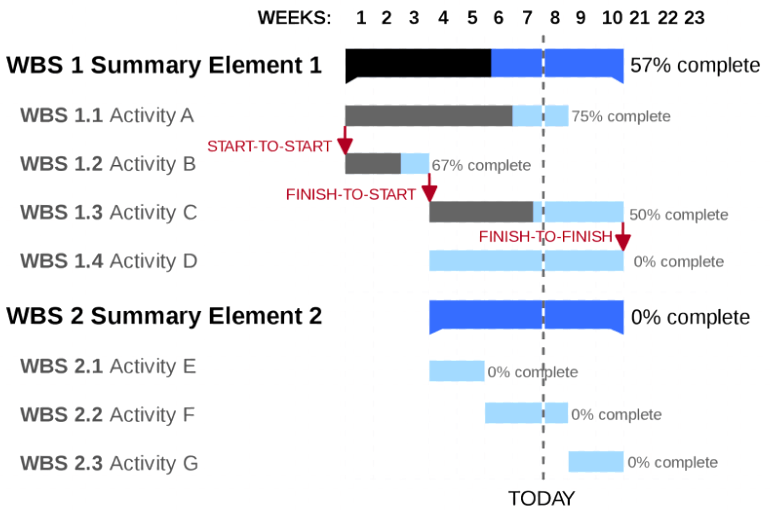
Oftentimes gantt charts get a bad rap, since they’re usually ineffective in long-term planning.

However, when a team has a relatively small stage of work, somewhere between two and six weeks, a gantt chart serves to clearly break down each task, and when it’s to be completed alongside the other tasks.

In the short-term, a gantt chart makes it easy to identify when it’s time to do things like order supplies and recruit staff.

Network Diagrams

Network Diagrams

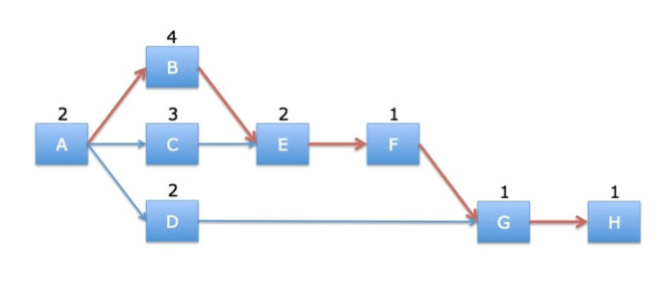
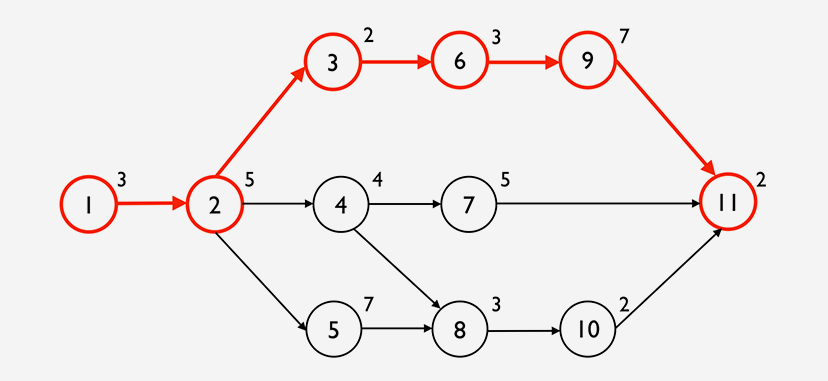
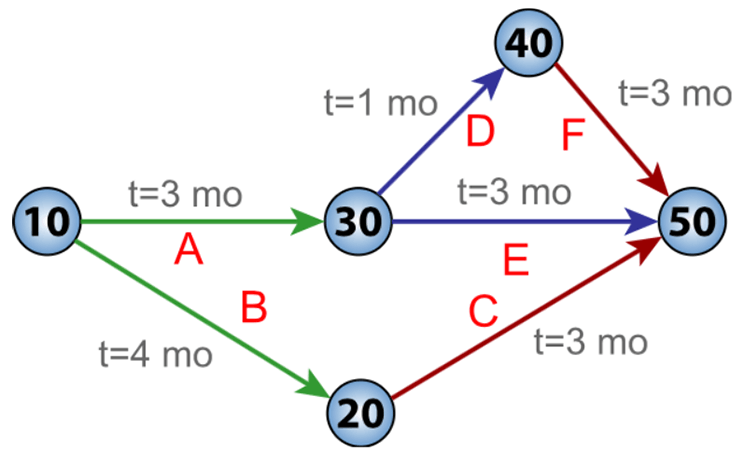
A network diagram is another effective way to visually lay out the workflow during a project stage. It quickly identifies potential bottlenecks, and clarifies each task in its relations to other tasks.

In sum, rolling wave planning provides key benefits to a project, but it won’t “just happen.” The right tools and practices allow teams to effectively and thoroughly plan each stage of work at the right time.

Conclusion

Project managers are always pressured to present certainties to the client, upper management, and other various stakeholders.

Yet, so much about a project is uncertain. And so regardless of this pressure, it’s generally best to plan projects incrementally. Rolling wave planning means to create a large plan at the beginning, and then increasing smaller more detailed plans at each stage.

Letting things flow and being ok with some unknowns gives the project space to breathe. And ultimately, this reduces overall risk and improves the project’s output.

Eye-Opening Books for Building a Team with Dynamism

Team Building Books

Don’t you sometimes wonder what your employees say over happy hour, after they’ve left the office and let their hair down? Do they brag and name drop about “their” company, or rather talk about “those people” they work with, and discuss the workday like it’s a painful slog?

These casual comments have significant implications. They reveal a company’s culture and the esprit de corps within the team. Employees who brag know they’re part of something, that they belong. Those who gripe aren’t convinced their contribution matters.

Listening in on some of this banter would provide a clear indication as to the kind of work that needs doing around the office.

But team building is such a challenge! Isn’t it frustrating to have to continually build rapport with a group that has constant turnover, and disappointing to watch a group of talented people bicker and compete, and underperform as a result? Plus, at times, it feels nearly impossible to come up with team-building activities that aren’t a total turnoff to most of the staff.

Rather than leading a team that’s running in unison like a pack of wolves, sometimes it feels more like a group of slinking cats who’re eying one another as they groom themselves at their desks and compete for the top rung.

It’s easy to look over the fence and see others who’re doing something right; those teams that head out together on the weekends to fish or play golf, the ones who are so devoted to their manager that they’ll never leave the company, regardless of pay or promotion opportunities.

What do they know? What’s their secret?

Many have spoken and offer persuasive and insightful answers. If you’re looking to improve culture, increase camaraderie and build collaboration, then let’s dig into the best books on team building, to discover the recipe for building a dynamic team.

Stick Together: A Simple Lesson to Build a Stronger Team by Jon Gordon & Kate Leavell

Stick Together - A Book on Team BuildingPublisher: Wiley
Year Published: 2021
Number of Pages: 128

Didn’t someone once say that the most important lessons are learned in kindergarten?

Stick Together looks like a book you might see on the shelf of a children’s classroom. The font is as large as your pinky fingernail and it has a picture on every page. You can flip through this book in under an hour.

But don’t write off Jon Gordon and Kate Leavell’s book as infantile. Its readers say it has a profound lesson to impart.

Stick Together tells the story of Coach David and his basketball team. At the beginning of the book, we find David completely at a loss as to why a team of capable athletes continually falls short of expectations.

He seeks inspiration from a fable his mother told him about broken sticks, and over the course of the book, imparts seven lessons to his team that brings them back into a winning position.

The book is helpful for anyone leading a high performing, competitive team. It provides the framework for a leader to create an atmosphere where the team doesn’t seek to outshine one another, but collaboratively work toward the same goal. Its lessons can be applied to any group.

The 126 pages are divided into ten chapters, seven of which impart the book’s lessons: believe, ownership, connection, love, inclusion, consistency and hope, unbreakable. Resources at the end serve to help the reader apply the tips to his or her situation.

This isn’t Gordon’s first foray into writing: he’s written five other picture books, including You Win in the Locker Room, as well as ten bestsellers.

Readers find that the lessons work with children, adults and even families. The practical takeaway tips, however, fall short of some of Gordon’s other books.

Leavell is a former NCAA coach who now gives keynote speeches and coaches organizations on unifying teams.

Surrounded by Idiots: The Four Types of Human Behavior and How to Effectively Communicate with Each in Business (and Life) by Thomas Erikson

Surrounded by Idiots - A Book by Thomas EriksonPublisher: Essentials
Year Published: 2014
Number of Pages: 304

“Everything you say to a person is filtered through his frame of reference, biases and preconceived ideas,” is how Thomas Erikson begins his internationally bestselling book, Surrounded by Idiots.

This brilliant title compels anyone and everyone who sees the book to pick it up and flip through it, as we’ve all had days when this phrase captures our feelings exactly.

We’re not really surrounded by idiots, however, Erikson says, but rather people who see and think differently from us.

According to Erikson, there are only two scenarios in which you can be yourself without reservation. The first is when you’re alone in a room, and the second is when you’re surrounded by other people exactly the same as you.

In all other scenarios, you need to gauge how you’re coming across and how other people are behaving. Assessing other’s behavior, cataloging it, then adapting and morphing your own is key to collaboration.

“There is no such thing as proper or incorrect behaviors….within reasonable limits, of course.”

With this book, Erikson challenges team leaders to appreciate a variety of communication styles, and he provides guidance on how to interact with people of different “colors.” The lessons help anyone, whether at work or in everyday interactions. However, he doesn’t recommend using his system to classify children.

In friendly, approachable prose, he divides people into four colors that represent four types of human behavior:

  • Red: The alpha who takes charge.
  • Green: The laid-back types who cannot make decisions.
  • Yellow: The head-in-the-clouds dreamer.
  • Blue: The perfectionist.

Most people are a combination of two colors, some are one color, while a few are a combination of three. Behavior patterns refer to “the whole set of attitudes, beliefs, and approaches that govern how a person acts.”

Communication is a dance of reading someone for the colors they’re giving off, and then determining an effective approach for interaction.

“Communication Happens on the Listener’s Terms” is a title to one of his chapters. He also covers “Adaptation: How to Handle Idiots (i.e., Everyone Who Isn’t Like You)” and even “What Makes Us Mad as Hell” (hint: the answer varies depending on a person’s color). It includes a quiz at the end to codify what lessons the reader has taken away.

Erikson is a charismatic behavior expert who gives lectures all over Sweden. This book became a runaway bestseller when it was first published in 2014, and is translated into over 40 languages! It’s the first in a series, which also includes: Surrounded by Bad Bosses (and Lazy Employees), Surrounded by Setbacks, Surrounded by Narcissists and Surrounded by Psychopaths.

Readers enjoy spotting the “colors” of various people in their life. It helps to explain the formerly unexplainable behaviors of the “idiots” surrounding them.

The Five Dysfunctions of a Team: A Leadership Tale by Patrick Lencioni

The Five Dysfunctions of a Team - A book on Team BuildingPublisher: Jossey-Bass
Year Published: 2002
Number of Pages: 229

It would seem that an organization with an exceptionally talented team and innovative products would have a leg up on competition.

According to Patrick Lencioni, author of The Five Dysfunctions of a Team, talent and innovation aren’t the pathway to success. Rather, it’s teamwork. Lencioni posits that a strong team could lead any industry and with his book, he gives a formula for creating one.

“Teamwork remains the ultimate competitive advantage, both because it is so powerful and so rare.”

Similar to Stick Together, The Five Dysfunctions is a fictional story with a lesson. In the first 180 pages, the character Kathryn tells her story. As the new CEO of Decision Tech, she’s met with an unwelcoming team that challenges her to stretch and develop her team-building skills.

Other characters include Mickey, the Debbie-downer who’s also a top-notch worker, and Martin the engineer and developer who likes to work on his laptop during staff meetings.

Lencioni’s keen storytelling skills make it easy to get immersed in the struggles and triumphs at Decision Tech.

In the book’s second half, Lencioni breaks down the five dysfunctions of a good team: absence of trust, fear of conflict, lack of commitment, avoidance of accountability, inattention to results. He also provides accompanying worksheets to help the reader incorporate takeaways into his or her organization.

Lencioni has written ten business books which have sold three million copies worldwide. He’s the founder and owner of the coaching firm, The Table Group, and teaches lessons to a variety of organizations and groups.

Readers find the story format makes the lessons easy to absorb. However, they believe he needs to provide case studies to back up his assertions about team building.

We’re All in This Together: Creating a Team Culture of High Performance, Trust, and Belonging by Mike Robbins

We're All in This Together - A Team Building by Mike RobbinsPublisher: Hay House Business
Year Published: 2020
Number of Pages: 208

Building esprit de corps within a group of people is no small feat. And it doesn’t take a whole lot of squabbling to upend all the hard work.

Take a remote team environment, for example. It’s easy to write something snarky and offensive within a communication platform that you’d never say directly to a person in the office. And it’s much harder to repair the damage on a video conference platform than at the water cooler the following day.

In his book, We’re All In This Together, author Mike Robbins talks about teamwork and the “fierce urgency of now,” echoing the sentiments of Martin Luther King, Jr.

So much in the work environment and the culture threatens to break down teams and upend unity. And so it’s more important than ever to apply tactics and strategies that bring teams together.

He conflates teamwork with workplace culture, defining it as: “Those intangible factors of a team that either brings them together or pushes them apart, as well as the quality of the relationships and the collective sense of the group.”

This book is great for a leader whose team lacks pizazz and connection, particularly in a remote environment. It offers actionable advice and takeaways, with exercises throughout.

Robbins incorporates the teamwork lessons he learned playing baseball as a boy, and later professionally for Kansas City.

The book covers four pillars of teamwork: create psychological safety, focus on inclusion and belonging, embrace sweaty-palmed conversations and care about and challenge each other.

Robbins is the author of four other books, including Be Yourself, Everyone Else is Already Taken and Bring Your Whole Self to Work. He hosts the Podcast We’re All In This Together.

His readers find that this book is another swing and a hit, and that the takeaways are easy to apply in a workplace setting.

Work Tribes: The Surprising Secret to Breakthrough Performance, Astonishing Results, and Keeping Teams Together by Shawn Murphy

Work Tribes - The Team Building Book by Shawn MurphyPublisher: Harper Collins
Year Published: 2019
Number of Pages: 272

When listening in on employees at work, do you hear a lot of first-person plural pronouns such as “we,” “us,” and “our”?

Team members who say things like “What’s going on with our project” and “Let’s get this done” communicate that they see themselves as part of the organization. It means they have a sense of belonging, which is a key component of teamwork, asserts Shawn Murphy, author of Work Tribes.

“Our human needs have one particular secret that shapes how we view ourselves and our place in this world, personally and professionally…it is belonging.”

“Belonging is beautiful. It is messy.”

Murphy pushes against an emerging trend of promoting diversity within a company. We need to stop focusing on our differences, and establish foundations on common principles and shared beliefs.

He provides an incisive definition of both “university” and “diversity” that gets down into the Latin root for each word.

Diversity emphasizes separateness. This value focuses on what makes us all different.

University looks to the whole, the universal. This value focuses on similarities.
Murphy communicates a clear and persuasive message with his book: by focusing on universalities and not diversities, a leader creates a culture of belonging where everyone participates.

He provides guidance on how a leader intentionally creates this sense of belonging, which includes being vulnerable and treating employees like people and not resources.

The book is written in three parts, and the third focuses on Unifying Your Tribe, with chapters on Feeling Valued, Wanted and Welcomed.

Murphy has led workshops on leadership for over two decades, and is also the author of the book The Optimistic Workplace. His readers totally buy into his message, and find that the book is well organized.

Quick Team-Building Activities for Busy Managers: 50 Exercises that Get Results in Just 15 Minutes by Brian Cole Miller

Quick Team-Building Activities for Busy Managers BookPublisher: AMACOM
Year Published: 2003
Number of Pages: 171

Have you ever heard someone audibly groan when it comes time for group activities at the office? Most employees show up expecting simply to work, so it can be a real challenge sometimes to convince them to role play and to share feelings.

Brian Cole Miller promises that none of the activities in his book Quick Team-Building Activities for Busy Managers get mushy, strenuous or complicated. Rather, within 15 minutes or less, each activity instills a valuable lesson into a team.

“Can you really get results in less than 15 minutes? Yes, as long as your expectations are realistic. Longstanding issues will not be resolved. Age-old antagonists will not emerge as best friends. Major obstacles will not disappear.”

What results can you expect? Breaking the ice, building rapport and creating a culture of camaraderie and trust within any group, including student organizations, church groups, and work environments. Plus, the activities are fun.

Miller has organized his book to make it easy to flip through for ideas.

The first two chapters are about setting the stage. They cover how to run a team-building activity, including selecting the right activity, preparing, explaining, debriefing and finally reinforcing the learning in the day-to-day.

The following chapters group the activities according to their objectives, which include: communicating, connecting, cooperation, coping (deal with change), creativity (problem-solving), appreciating and supporting.

Most of the activities don’t require any materials, and a few require things like cards, pennies, magazines and paper clips.

Each activity is presented with the same format, making them easy to quickly browse and understand. He also offers variations on each activity.

Miller trains managers and consults organizations at his company, Working Solutions, Inc. His clients include UPS and FranklinCovey. He’s also written two other books, including Keeping Employees Accountable for Results.

Although some find the exercises too simplistic, others feel it offers enough ideas for any situation or place. It’s also a good starting point for generating other ideas.

The Ideal Team Player: How to Recognize and Cultivate the Three Essential Virtues by Patrick Lencioni

The Ideal Team Player BookPublisher: Jossey-Bass
Year Published: 2016
Number of Pages: 226

According to Patrick Lencioni, every team member needs to be hungry, humble and smart.

“During the past twenty years of working with leaders and their teams, I’ve seen time and again that when a team member lacks one or more of these three virtues, the process of building a cohesive team is much more difficult than it should be, and in some cases, impossible.”

The Ideal Team Player provides a leader guidance on who to hire and what to cultivate in employees in order to create a robust team.

In order to identify and build the right traits, it’s necessary to understand just what each of these three virtues mean.

Hungry: An autonomous and self-motivated employee who’s driven to learn, expand, and contribute.

Humble: An employee who appreciates that everyone has something to contribute, and is willing to listen to other perspectives.

Smart: Someone with a high emotional intelligence who “gets” different kinds of people and collaborates well with others.

Again, Lencioni’s gone with the format of imparting a lesson through fiction. In The Ideal Team Player, we follow Jeff Stanley, who leaves Silicon Valley to run a construction company in Northern California. Soon, he finds he’s taken on more than he can chew.

In the second part, Lencioni spells out the characteristics of an ideal team player, and fleshes out three three virtues in greater detail.

The Ideal Team Player is a top seller on Amazon. Readers swear by this book, and advise leaders to make it mandatory reading for everyone on staff.

Lencioni works as a consultant. He’s written several other books and enjoys using stories to illustrate important lessons.

Conclusion

Clearly, these books have a lot of wisdom to impart about team building. Many of the authors believe that teamwork is the key ingredient to success in any organization.

Of teamwork itself, they have a few things to say as well. It’s about collaborating and not competing. It means reading other people, appreciating their personality and style of communication, and morphing our own to complement it.

And best of all, it’s possible to instill these values with simple group activities.

What’s your next step to building a successful team?

What is a Project Scope Document (and How to Create Your Own)

Project Scope Document

You might be thinking, what is a project scope document? And do I really need one?

The short answer is: a project scope document is essential to the success of any project, and yes, you definitely need one.

A project scope document is a living document that outlines the scope of a project. It defines what a project is, what it will accomplish, and what deliverables you can expect at the end.

A well-crafted scope document can mean the difference between a project that comes in on time and on budget and one that spirals out of control.

In this post, we’ll take a close look at what a project scope document is, why it matters, and how you can create one for your next project.

Project Scope Document Definition

Project Scope Document defined…

A project scope document is essentially a roadmap for your project.

It outlines what you’ll be working on, what deliverables you’ll be expected to produce, and what milestones need to be met along the way. In short, it sets expectations for everyone involved in the project so that there are no surprises down the road.

5 Benefits of a Project Scope Document

There are plenty of good reasons to create a scope document for your project, but here are five of the most important benefits:

1. A project scope document can help you win over stakeholders.

If you’re trying to get buy-in for your project from upper management or other key stakeholders, a well-crafted scope document can be a powerful tool.

By clearly outlining the goals, deliverables, and timeline for your project, you can show decision-makers that you’ve thought through every aspect of the project and that you’re confident you can deliver on your promises.

2. A project scope document can keep your team focused.

When you’re working on a large project with multiple team members, it can be easy to get off track.

A good scope document can help keep everyone focused on the task at hand by clearly defining what needs to be done and when it needs to be done.

3. A project scope document can help you avoid scope creep.

One of the most common problems faced by project managers is scope creep, which is when the scope of a project gradually expands beyond its original boundaries.

A well-defined scope document can help prevent scope creep by setting clear boundaries for what can and cannot be included in the project.

4. A project scope document can help you manage expectations.

If you’re working with an external client or partner, a scope document can be a helpful way to manage expectations.

By outlining the specific deliverables you’ll be responsible for, you can avoid misunderstandings down the road.

5. A project scope document can save you time and money.

By clearly defining the goals, deliverables, and timeline for your project, you can avoid wasting time and money on activities that are outside the scope of the project.

In other words, a good scope document can help you stay focused and on budget.

Project Scope vs Statement of Work

Project Scope Vs. Statement of Work

Let’s take a moment to clear up any confusion about the difference between a project scope and a Statement of Work (SOW).

A project scope is a high-level overview of the work that needs to be done. It’s typically created at the beginning of a project and serves as a roadmap for the project manager and team.

A Statement of Work, on the other hand, is a more detailed document that outlines the specific deliverables, milestones, and timeline for a project. It’s typically created after the project scope has been approved and serves as a contract between the client and the vendor.

Now that we’ve clarified the difference between a project scope and a Statement of Work, let’s take a look at how to create a project scope document.

What to Include in Project Scope Document

What to Include in Your Project Scope Document

Now that we’ve discussed the benefits of creating a scope document, let’s take a look at what you need to include in yours.

Every project is different, so there’s no one-size-fits-all template for creating a scope document. However, there are certain elements that should be included in every scope document.

Here are some of the most important things to include:

1. Problem Statement

It’s not an overstatement to say that every project exists to solve a problem. Whether you’re developing a new product or launching a marketing campaign, your project should be focused on solving a specific problem.

Your scope document should begin with a clear statement of the problem you’re trying to solve. This is often called the “business case.” Essentially, you need to articulate why this project is necessary and what benefits it will bring.

2. Goals and Objectives

After you’ve stated the problem that your project will solve, you need to define the goals and objectives of the project. What are you hoping to achieve? What are your specific goals?

Be as specific as possible when defining the goals and objectives of your project. This will make it easier to measure the success of the project later on.

3. Deliverables

Next, you’ll need to identify the specific deliverables for your project.

A deliverable is any tangible output that your project produces. It could be a digital product, like a new software application, or it could be an intangible service, like a marketing campaign, or even something physical, like a new piece of equipment.

The important thing is that your deliverables are specific and measurable. This will make it easier to assess whether or not your project was successful.

PRO-TIP: For each deliverable, you should include a brief description, as well as any associated deadlines.

Timeline

4. Timeline

In addition to identifying the deliverables for your project, you’ll also need to establish a timeline for completing those deliverables.

Your timeline should include specific milestones for each stage of the project, as well as target dates for completing each deliverable. Remember to be realistic when creating your timeline. Otherwise, you risk setting yourself up for failure.

5. Budget

This is obvious, but you’ll need to establish a budget for your project.

Your budget should include all of the costs associated with completing the project, including labor, materials, and overhead.

Once again, it’s important to be realistic when creating your budget. Otherwise, you could find yourself in financial trouble down the road.

6. Stakeholders

You’ll also need to identify all of the stakeholders for your project. A stakeholder is any individual or organization that has a vested interest in the success or failure of your project.

Some common examples of project stakeholders include:

  • The client or customer
  • The sponsor
  • The project manager
  • The project team
  • The executive sponsor
  • External vendors

It’s important to identify all of the stakeholders for your project because they will all need to be kept up-to-date on the progress of the project. In addition, you may need their input at various stages of the project.

Assumptions and risks

7. Assumptions and risks

Also, you’ll need to identify any assumptions or risks associated with your project.

An assumption is something that is taken for granted. For example, you may assume that the project team will have the necessary skills to complete the project.

A risk is anything that could potentially jeopardize the success of your project. For example, you may be at risk of going over budget if the project takes longer than expected to complete.

By identifying the assumptions and risks associated with your project, you can develop contingency plans to mitigate those risks.

8. Approval Process

Last but not least, you’ll need to establish an approval process for your project.

This is the process that will be used to approve or reject changes to the scope of your project. It’s important to have a well-defined approval process in place to avoid scope creep.

The approval process should include the following steps:

  • Submit a change request: Anytime someone wants to make a change to the scope of the project, they must submit a change request.
  • Review the change request: The change request will then be reviewed by the project manager and other relevant stakeholders.
  • Approve or reject the change request: Once the change request has been reviewed, it will be either approved or rejected.
  • Update the project scope document: If the change request is approved, the project scope document will be updated to reflect the changes.

Now that we’ve gone over what should be included in your scope document, let’s take a look at how you can put it all together.

Putting Scope Document Together

Putting Your Scope Document Together

The best way to put together your scope document is to use a modular approach.

Modular = dividing the work into manageable parts or modules.

This approach will allow you to break down the scope of your project into smaller, more manageable pieces. As a result, it will be easier to make changes to your scope document as the project progresses.

Start by writing each section of your scope—problem statement, goals and objectives, deliverables, etc.—as its own standalone section .

Then, once you have all of your individual sections written out, start putting them together into a cohesive whole.

Here’s an overview of how each section should flow together:

  1. Introduction
  2. Problem statement
  3. Goals and objectives
  4. Deliverables
  5. Budget
  6. Stakeholders
  7. Assumptions and risks
  8. Approval process
  9. Conclusion
  10. Appendix (optional)

When writing your individual sections, be sure to use clear and concise language.

Remember, the goal of your scope document is to communicate the key details of your project to your team and stakeholders. Therefore, it’s important that everyone is on the same page from the start.

Take a step back and ask yourself if the data you’re including is really essential to the project.

If it’s not, then leave it out. The last thing you want is for your scope document to be so long and detailed that no one bothers to read it.

Conclusion

A well-crafted scope document can mean the difference between a project that comes in on time and on budget and one that spirals out of control…

Essentially, the scope of your project is the roadmap that you’ll follow to get from point A to point B.

By taking the time to develop a clear and concise scope document, you can avoid costly mistakes and ensure that your project stays on track.

Now that you know what should be included in your scope document, it’s time to get to work!

Issues vs Risks in Project Management: A Breakdown and Analysis

Risks vs Issues in Project Management

Every project manager knows that “things” are going to happen, regardless.

A project consists of many moving parts. It’s about building something new, or establishing a new process, and operates within the constraints of time, money, and resources. Plus, it requires coordinating a checkerboard of activities.

And so snafus, unforeseen occurrences, problems, issues, and even disasters are bound to occur.

From time to time, this may feel discouraging to project managers. It’s as though their job is about facing inevitable storms head on, day-in and day-out.

Wouldn’t it be lovely, rather, to breeze through issues and storm clouds at a nice clip, with the wind at your back?

Believe it or not, there is a way. It’s all about taking the right approach to risks and issues.

Want to understand how? In this post, we’re taking a careful look at risks and issues, and exploring how managing both is key to navigating all of a project’s moving parts with ease.

Difference Between a Risk and an Issue

What’s the Difference Between a Risk and an Issue?

Risks and issues sound almost like the same thing. While in fact, they differ significantly. Let’s define each term, then look at some examples.

Risk: A Definition

A risk is an event that hasn’t taken place.

The standard project management definition says: “A risk is the probability of occurrence of a specific event that affects the pursuit of objectives. Risks are not negative by definition. In project management, opportunities are also considered risks.”

With a risk, the specific event may or may not take place. The event’s impact and the probability of it occurring, however, is significant enough that it merits attention. The event would impact the project’s constraints, or the deliverable, either for better or for worse.

Simply put, a risk is uncertainty that matters.

Examples of Risks

Risks vary depending on the nature of the project. Every project faces the risk of losing skilled team members. In a cybersecurity company, viruses pose a serious risk. In construction, inclement weather that stalls a project would significantly impact the timeline. 

On the flip side, projects face positive risks as well. These risks might include the development of a new technology that would save the project time and money, or the addition of a skilled expert to assist with creating deliverables. 

Issue: A Definition

An issue is a risk that has occurred, which the team is dealing with in the present.

Here is the standard project management definition for issue: “Anything that can cause problems for a project. The term typically refers to major problems that cannot be tackled by the project team on their own.”

Issues are exclusively a manifestation of negative risks. In order to resolve or mitigate issues, they require immediate action.

Simply put, issues are certainties that matter.

Examples of Issues

Issues vary depending on the project. Every project may face the issue of employees quitting during the project’s execution. An issue faced by a cybersecurity company may be a virus attacking one of its servers. An issue faced by a construction project might be the delay of materials that forces a project to stop mid-track.

Similarities and Differences Between Issues and Risks

Both risks and issues impact the timeline, cost, scope and quality of a project. Their significance depends on how they impact a project’s constraints.

However, issues have already occurred, and risks may or may not occur. Additionally, issues always impact the project negatively, while risks may impact the project both negatively and positively.

Risk Management

How to Mitigate Issues with a Risk Management Plan

Every project faces issues, as discussed. Anticipating issues lessens their severity and may even avert some altogether. This “anticipation” is known as a risk management plan.

A risk management plan requires buy-in. To many project managers, it doesn’t make sense to spend time planning for events that may not occur. They’d just as soon deal with each issue as it transpires. Once a project manager appreciates that anticipating issues ultimately saves time, money and resources, they are ready to create a risk management plan.

A risk management plan analyzes a project at the onset, and anticipates all possible occurrences, both positive and negative. The plan also considers the likelihood of each occurrence. For example, a winter construction project would anticipate inclement weather, and place a high probability on this occurrence.

Here are a few components of a comprehensive risk management plan.

Know Your Environment

A project’s risks are determined by its environment. And so identifying all of a project’s assets, stakeholders, deliverables and constraints is the first step in a risk management plan.

This stage is about answering the question: “What stands to be lost here?” and then identifying the threats and vulnerabilities of each asset.

Measure Your Risk Appetite

An organization also looks to its culture and mission statement to determine how to handle risk. Depending on its level of tolerance, some companies take on a lot of risk, while others choose to transfer risk elsewhere.

Put a Plan in Place

When the vulnerabilities and threats for each asset have been identified, the next step is to determine how to handle them. Risks can either be avoided, transferred, accepted, or mitigated.

Avoiding risks means you eliminate any chance of facing the risk altogether. This is rarely a feasible solution for most projects. For example, in cybersecurity, disconnecting from the internet would avoid key risks, but it would also preclude daily business operations.

Transferring means moving the risk to another organization or company. For example, a company might transfer the risk of theft to a security company.

Accepting is when the organization faces the risk head-on. When a company has the capability, this is an ideal way to handle a risk.

Mitigating risk is a process of decreasing the severity of an occurrence. A company might mitigate the risk of exceeding the budget by setting aside a portion for unexpected expenses.

Run Mock Issues

For any risk the organization accepts, running a mock issue ensures that everything is in place, should the event transpire.

A mock issue is essentially a dry run or a fire drill. For example, a cybersecurity company might run a recovery plan for the disaster of losing all company data. The drill in this instance would involve moving everything over to another data center.

Although running mock issues isn’t feasible in every scenario, it’s a helpful exercise whenever possible.

These are some key areas to cover with a risk management plan. Carefully considering all anticipated risks means the project is more likely to stay within its constraints when the issues occur.

How to Manage Issues

How to Manage Issues

A risk management plan ensures you have a proactive and not reactive approach to issues when they surface. It’s about developing a process for handling these issues. Rather than playing a game of whack-a-mole to resolve them, this plan ensures issues are prioritized and then managed effectively.

Here is what to include in an issue management plan:

  • A Problem Statement: A problem statement puts an issue or problem into writing. This serves to focus and direct the group’s energy toward solving it.
  • An Impact Assessment: An impact assessment considers the significance of issues, and how they affect the project’s overall objective. This is a key step toward prioritizing issues.
  • A Log: Recording issues into a log helps determine which issues to handle, and in what order.

In sum, risk and issue management plans, taken together, create a strong shield against all the risks and issues a project faces.

Conclusion

One attribute of a stand-out project manager is that he or she embodies Murphy’s Law. By adapting the mindset that if “anything can go wrong, it will,” the project manager is on the lookout for any and all issues.

Although snafus are sure to occur, risk and issue management ensures they’re resolved efficiently, allowing the team to instead focus its energy on achieving the project’s objective.

Communication is central to resolving issues effectively. Are you managing a remote team? Be sure to visit Teamly. Our work boards and task lists make communication throughout a project a cinch. Visit us and sign up for a free account today!

How to Accurately Estimate Costs & Budget for Your Project’s Success

Cost estimation and budgeting in project management

If you’re a project manager, then you know that one of your most important duties is to estimate the costs and budgets for your projects.

Without accurate estimates, it’s nearly impossible to ensure that your project stays on track and within budget.

Yet, many project managers still struggle with this important task.

In this blog post, we’ll cover everything you need to know about cost estimation and budgeting so that you can set your projects up for success.

What is Cost Estimation and Budgeting

What is Cost Estimation and Budgeting?

Cost estimation and budgeting is the process of predicting the cost of a project and then allocating funds accordingly.

This aspect of the planning process allows project managers to identify potential risks, allocate resources, and plan for contingencies.

Why Does Cost Estimation and Budgeting Matter?

How important is it to make informed cost estimates for projects?

In short, it’s essential.

Consider what can happen if you underestimate the cost of a project:
You’ll likely end up going over budget, which will put your project at risk of being canceled or delayed.

Your team will be forced to work longer hours (and maybe even weekends) to make up for the underestimated budget, which can lead to burnout.

On the other hand, if you overestimate the cost of a project, you may:

  • Waste valuable resources that could be better used elsewhere
  • Hurt your company’s bottom line
  • Damage your reputation as a project manager

Cost estimation and budgeting is important because it allows businesses to make informed decisions about whether or not to proceed with a given project.

If the estimated cost of a project exceeds the available budget, the business may decide to scale back the scope of the project or even cancel it entirely.

If the estimated cost of a project is lower than the available budget, the business may choose to invest additional resources in order to increase the likelihood of success.

In either case, having accurate cost estimates is essential for making sound decisions about projects.

Key Elements of cost estimation in project management

Key Elements of cost estimation in project management

There are several key elements that must be considered when estimating the cost of a project. These include:

  • Materials
  • Labor
  • Overhead
  • Equipment
  • Permits
  • Fees
  • Taxes
  • Contingencies

Accurate cost estimates for each of these elements is essential for developing an accurate overall estimate for the project.

Methods for Estimating Costs and Budgets for Projects

Different methods for Estimating Costs and Budgets for Projects

There are a number of different methods that businesses can use to estimate the costs of their projects.

The most common methods are bottom-up estimating, top-down estimating, three-point estimating, analogous estimating, cost of quality, expert judgment, and reserve analysis.

It’s important to state up front that there is no single “right” way to estimate project costs. The best method to use will vary depending on the specific circumstances of the project.

That said, let’s take a closer look at each of these methods so that you can get a better idea of when and how to use them.

Bottom-up Estimating

Bottom-up estimating is a technique that involves estimating the cost of each individual component of a project and then summing those estimates to get a total project cost estimate.

This approach is often used for large, complex projects because it provides a high degree of accuracy. However, it can also be time-consuming and expensive.

Top-down Estimating

Top-down estimating is a technique that involves estimating the total cost of a project and then allocating that cost to individual components based on some rational basis.

This approach is often used for small or medium-sized projects because it is less time-consuming and expensive than bottom-up estimating. However, it can be less accurate.

Three-point Estimating

Three-point estimating is a technique that involves estimating the most likely cost, the best-case cost, and the worst-case cost of a project.

The total cost estimate is then calculated by taking the average of these three estimates. This approach is often used for projects where there is a high degree of uncertainty.

Analogous Estimating

Analogous estimating is a technique that involves estimating the cost of a new project by comparing it to similar projects that have been completed in the past.

This approach is often used for projects where there is a limited amount of data available.

Cost of Quality

Cost of Quality

The cost of quality is a technique that involves estimating the cost of ensuring that a project meets all required quality standards.

This approach is often used for projects where quality is a critical concern.

Expert Judgment

This approach is exactly what it sounds like – experts are consulted to provide their estimates of the cost of a project.

It’s often used for projects where there is a limited amount of data available.

Reserve Analysis

Reserve analysis is a technique that involves estimating the amount of money that should be set aside to cover unexpected costs that may arise during the course of a project.

This approach is often used for large, complex projects where there is a high degree of uncertainty.

Which method should you use? The best method to use for estimating the cost of a project will depend on the specific project. Factors to consider include the size and complexity of the project, the amount of data available, the importance of quality, and the degree of uncertainty.

“must do’s” when planning your budget

Here are some “must do’s” when planning your budget

No matter which method you use, there are a few best practices that you should follow to ensure accuracy:

  • Use historical data whenever possible
  • Use multiple methods to cross-check your estimates
  • Get input from as many relevant people as possible
  • Use software to help with the estimating process
  • Continuously monitor and update your estimates

By following these best practices, you can be confident that your estimates are as accurate as possible. This will help you to budget for your projects more effectively and avoid cost overruns.

Getting Started With Cost Estimation & Budgeting

Now that we’ve covered the basics of cost estimation and budgeting, let’s take a look at how you can start doing it for your own projects.

Step 1 – We always begin with a project plan. This document outlines the scope of the project, the objectives, the timeline, and the overall budget.

Step 2 – Next, we create a work breakdown structure. This is a document that breaks down the project into smaller, more manageable tasks.

Step 3 – Then, we estimate the cost of each task by using one of the methods described above.

Step 4 – Finally, we add up all of the estimates to get the total cost of the project. This is the number that we’ll use to create the project budget.

Practical example for cost estimation & budgeting

Here’s a practical example for cost estimation & budgeting

So let’s give this some teeth and look at a specific example.

Let’s pretend that we’re building a blog to drive organic traffic to our website and we need to estimate the cost of the project.

For this example, we’re going to use the bottom-up approach. Which as a reminder is where we estimate the cost of each task and then add up all of the estimates to get the total cost of the project.

The first step is to create a work breakdown structure. This will help us to break down the project into smaller, more manageable tasks.

Here’s a quick look at what our work breakdown structure might look like:

  1. Research blog topics
  2. Write blog posts
  3. Edit blog posts
  4. Format blog posts for SEO
  5. Publish blog posts
  6. Promote blog posts
  7. Measure results
  8. Repeat steps 2-7 on a regular basis

Now that we have our work breakdown structure, we can start estimating the cost of each task.

NOTE: Our goal is to publish 8 blog posts per month for the next 6 months so that our content will remain fresh and relevant for our audience.

Task 1: Research blog topics – 1 hour per week
Task 2: Write blog posts – 4 hours per week
Task 3: Edit blog posts – 1 hour per week
Task 4: Format blog posts for SEO – 2 hours per week
Task 5: Publish blog posts – 1 hour per week
Task 6: Promote blog posts – 1 hour per week
Task 7: Measure results – 1 hour per week

Now that we’ve estimated the cost of each task, we can add up all of the estimates to get the total cost of the project.

Task 1: Research blog topics – 1 hour per week x 26 (6 months) weeks = 26 hours
Task 2: Write blog posts – 4 hours per week x 26 (6 months) weeks = 104 hours
Task 3: Edit blog posts – 1 hour per week x 26 (6 months) weeks = 26 hours
Task 4: Format blog posts for SEO – 2 hours per week x 26 (6 months) weeks = 52 hours
Task 5: Publish blog posts – 1 hour per week x 26 (6 months) weeks = 26 hours
Task 6: Promote blog posts – 1 hour per week x 26 (6 months) weeks = 26 hours
Task 7: Measure results – 1 hour per week x 26 (6 months) weeks = 26 hours

Total cost of project:
26 + 104 + 26 + 52 + 26 + 26 + 26 = 314 hours

Now that we have the total cost of the project, we can create our budget.

Assuming our blogging website example above, we would need to budget for 314 hours of work at our chosen hourly rate.

If we break that down further, we would need to budget for:

  • 26 hours of research time at $25 per hour = $650
  • 104 hours of writing time at $50 per hour = $5,200
  • 26 hours of editing time at $75 per hour = $1,950
  • 52 hours of formatting time at $100 per hour = $5,200
  • 26 hours of publishing time at $25 per hour = $650
  • 26 hours of promotion time at $50 per hour = $1,300
  • 26 hours of measurement and analysis time at $75 per hour = $1,950

Total budget for project:
$650 + $5,200 + $1,950 + $5,200 + $650 + $1,300 + $1,950 = $17,500

And that’s basically what it looks like to estimate the cost of a project and create a budget!

Project cost estimation and budgeting

Conclusion

There are so many different ways to get the job done when it comes to project cost estimation and budgeting.

The important thing is that you find a method that works for you and your team and stick with it.

Don’t be afraid to experiment with different methods and strategies until you find something that works well for your business.

And last but not least, always remember to track your progress and revise your estimates and budgets as needed. Things change all the time in business and it’s important to be agile and adaptable in order to succeed.

Just remember, with careful planning and execution, your business can successfully complete its next big project without breaking the bank!

The Pitfalls of Trying to Hard: Gold Plating in Project Management

Gold Plating in Project Management

Have you ever had clients who fret and fuss over every detail? Just so you can sleep at night, you probably find yourself tending to their every need.

Or have you ever dealt with the fallout of a disappointed client?

None of this is ever any fun.

In order to avoid these scenarios, every seasoned project manager develops a compulsion to overcompensate.

The problem with going above and beyond, however, is that it leads to another danger zone, known as gold plating. Because in the world of project management, perfection means methodically punching away at a project, and delivering just what the clients requests. Nothing more and nothing less.

At first blush, this doesn’t make a lot of sense. How could striving to exceed customer expectations lead to more problems?

That’s what we’re going to cover in this post. As it turns out, everything that’s golden is not glittery. So if you want to improve your approach to project management, let’s take a look at the ins and outs of gold plating, as well as strategies for avoiding it.

Gold Plating Definition

Gold Plating: A Definition With Examples

Traditionally, gold plating is the practice of covering a less precious metal with a thin layer of gold. A pair of gold plated rings may look like they’re made from gold, but scratching below the surface reveals they consist mostly of copper.

Gold plating, then, is also a metaphor for presenting a shiny exterior in order to conceal something less desirable beneath the surface. A company may present a gold plated earnings report, when in fact its books are in disarray and it’s on the brink of bankruptcy.

Gold Plating Definition

In project management, gold plating means adding something to a deliverable that’s outside the original scope of the project. Here’s the standard project management definition:

Gold plating: The practice of incorporating features and improvements that go beyond a product’s agreed-upon characteristics. This is generally done to boost customer satisfaction.

It’s easy to envision how gold plating is desirable. At the beginning of a project, the expectations are laid out, and everyone understands the requirements and deliverables. However, the execution of a project gives rise to a variety of scenarios and conflicts. Maybe a team member becomes exuberant about a certain feature, and all on his own decides to embellish and add onto it. Or maybe the project isn’t proceeding so well, and the team wants to conceal poor workmanship with a few add-ons.

However, this practice of gold plating opens the door to new problems: additional risks, increased time and cost or a befuddled customer who doesn’t like the changes.

Examples of Gold Plating

Let’s look at a few examples of gold plating to get an idea of what it looks like in a project.

Take a bathroom remodel, for example. Maybe the original plan was to include one niche for soap in the shower. A contractor, concerned about pleasing the client, might decide to add an extra niche for shampoo bottles. However, the client may well be upset about this change, as it wasn’t in the original agreement. It could lead to an expensive scenario of having to re-do an entire wall of tiling.

Or in a software project, a team might decide to add a tutorial video to the log-in page. The client may be so pleased with the video that she wants a tutorial video on every page. Since this wasn’t in the original contract, the team is then pressured to perform this extra work at no pay.

Rather than exceeding customer expectations, gold plating is about being psychic and anticipating expectations the customer never even articulated. This can easily lead to misunderstandings and additional work.

In Contrast with Scope Creep

In Contrast with Scope Creep

Gold plating may sound a lot like scope creep. Both are similar in that they involve making changes to a project, and both lead to undesirable outcomes.

Notice, however, that gold plating is only about making one change to a project. However, scope creep refers to changes that affect all aspects of a project.

Here’s the project management definition of scope creep:

Scope creep refers to gradual changes in project scope that occur without a formal scope change procedure. Scope creep is considered negative since unapproved changes in scope affect cost and schedule but do not allow complementary revisions to cost and schedule estimates.

Although gold plating isn’t the same as scope creep, it can easily lead to it.

Let’s look at the bathroom remodel again. In order to spruce things up, say the designer decides to flank the bathroom mirror with sconces. Then, it turns out the homeowners like them so much, they want sconces added to other areas of the remodel as well, even though it was never part of the original agreement.

Adding the sconces started with just one change (gold plating), but it led to changes that increased the scope of the entire project, affecting its time and budget (scope creep).

The Problem with Gold Plating

The Problem with Gold Plating

Ideally, managing a project means meeting clearly defined requirements within agreed upon constraints, including a time frame and budget. Any changes to the requirements or scope follows a standard methodical procedure.

Gold plating ignores these processes and agreements, and in doing so introduces an assortment of problems into a project. Here’s a few of the possible effects of gold plating:

Introduces New Risks

At the beginning of a project, the team looks at all risks and develops a risk management plan that includes things like mitigating controls and a succession plan.

However, when a team makes an entirely unanticipated change, it assumes risks never before considered, with no plan to protect against them.

Requires Additional Time, Money and Resources

A project works within agreed-upon constraints, including time, money, risk and resources. Gold plating assumes additional time and resources that aren’t in the budget. For example, adding a functionality in a software project requires additional testing, time and costs. This means that another area of the project is neglected, or else the project exceeds its constraints.

Confuses the Team

When a project is poised for success, everyone, more or less, is working toward the same North Star. However, introducing random changes alters the focus of some team members. It becomes unclear where to place energy, and the team’s output and efforts become muddled.

Misleads the Client

Gold plating, even with the best intentions, gives the client something he never asked for. It means ignoring the contract and direct requirements and charting a new course. At its core, then, gold plating is dishonest. The client expects to receive what was agreed upon; altering this course is unethical and may well lead to legal snafus.

Leads to More Work

Even if an add-on looks simple, it may well lead to something else entirely. For example, say a team adds a feature that ends up not working. The team then has to spend time providing support–for a feature that wasn’t even required!
In sum, the best approach to a project is to reject the exuberance of an eager-beaver. Adopting a slow and steady approach wins the day.

The Allure of Gold Plating

The Allure of Gold Plating

If gold plating introduces so many problems, then why are teams enticed to engage in it? Here are a few of the perceived benefits of gold plating.

Meeting and Exceeding Expectations

This is the objective of every project manager, right? All too often “exceeding” sounds synonymous with providing a little extra. This line of thinking, as we see, gets teams into trouble. It can seem like an improvement to add a bonus, when in fact it introduces a host of problems.

In reality, meeting and exceeding expectations means taking an even keel approach. Providing honest work and consistent communication is the surest way to keep the client satisfied.

Creating a Glittering Distraction

Sometimes in a challenging project, the deliverable doesn’t look as “presentable” as the team might like. In order to conceal the rough edges, it’s tempting to fancy it up with a few extras.

But ultimately, the client understands what’s going on. Gold plating in the end comes across as an effort to conceal shoddy work. And that isn’t a recipe for developing a good business reputation or repeat service.

Gold plating is a little bit like dipping into a giant tub of french fries: on its surface it feels like a good idea. But before long it reveals itself to be nothing but a stomach ache.

Strategies to Avoid Gold Plating

Strategies to Avoid Gold Plating

Fortunately, gold plating can easily be avoided with these strategies.

Keep Teams Small

Gold plating is more likely to happen within large teams. A “design-by-committee” approach to a project leads to scenarios where no one is in charge and people make changes without following any procedures.

Ideally, a team never exceeds seven to nine members. When it becomes as large as ten, splitting the team into two ensures a commitment to excellence and quality.

Within a small team, only one or two people make decisions, and it’s easier to discuss potential changes with everyone.

Create a Strong Scope Document

A scope document lays out the parameters of a project. It includes its requirements, the deliverables and constraints around time, money, risk and resources. The scope document also discusses what won’t be included in the project, and assumptions around who is able to work and for how long.

Laying out expectations for everyone to see creates a strong antidote to gold plating.

Communicate Consistently

When teams communicate daily at a scrum meeting, and bi-weekly for retrospectives or wrap-ups, it allows everyone to air concerns and ideas. This way, everyone is abreast of new movements, and together the team discusses possible changes.

Follow a Change Management Process

Rather than gold plating changes into a project, following a procedure ensures that changes are carefully considered and beneficial. The objective of a change process is to make sure that the appropriate people oversee and approve the changes.

With a good procedure, the team communicates the change to a team lead or scrum master. Next, the leader submits the change request to the project manager, outlining the benefits, reason, cost, description and impact. The project manager is then responsible for assessing new risks and scope.

A Solid Gold Approach

A Solid Gold Approach

It really is ironic that trying too hard sometimes impedes your efforts.
Rather than “improve” a project through random add-ons, the best thing you can do for a customer is to deliver what they ask for. A team exceeds expectations through its quality of communication and service, not by adding “freebies” and “extras.”

Clear communication between the team and the client are key to minimizing incidences of gold plating.

If you’re managing a remote team, be sure to check out Teamly. This project management software makes it easy for teams to communicate continually, every single day.

Navigating Conflict in Virtual Teams: The How-To Guide

Conflict in Virtual Teams

If you’re a business leader, you’re likely no stranger to the challenges that come with managing a team. After-all you do work with people, and people are prone to conflict.

Now imagine you’re a leader responsible for managing a team that’s not just in the same building, but in different states or even countries. The challenges of managing a team are suddenly magnified because you can’t just walk down the hall to have a conversation or clear the air.

Virtual teams are becoming increasingly more common as technology makes it easier for us to connect with people around the globe. And while there are some advantages to working with a team that’s not physically in the same place, there are also some unique challenges that come with managing conflict.

In this blog post, we’ll explore the different types of conflict that can arise in virtual remote teams. We’ll also talk about how to identify these conflicts and how to manage them effectively.

By the end of this post, you’ll have a better understanding of how to keep your team functioning smoothly, even when everyone is working from different corners of the world.

Inevitability of conflict

Inevitability of Conflict

Conflict is bound to happen in any team dynamic—but it can be especially challenging in a remote setting.

That’s because, when you’re not face-to-face with someone, it’s easy to misread their tone or intentions. And when team members are located in different time zones, it can be difficult to coordinate a resolution.

Common sources of Conflict

Misinterpreted Cues

Experts say, somewhere between 70-93% of communication is nonverbal.

When you take away the ability to see someone’s face or body language, it’s easy to misinterpret what they’re trying to say.

It’s super easy to assume the worst when you can’t see the person you’re talking to.

Especially if on that given day, you’re feeling stressed, overwhelmed, or just generally not in the best mood.

The lack of context and the insecurity of the moment can quickly lead to a misunderstanding.

This is one of the most common sources of conflict in virtual teams.

Sometimes a delayed response can also be frustrating. If it takes someone a day or two to get back to you, it can feel like they’re not taking your issue seriously.

This can lead to even more miscommunication and conflict.

Unclear Roles and Responsibilities

When team members are unclear about their roles and responsibilities, it can lead to a feeling of being overwhelmed or unimportant.

This can be especially true in virtual teams, where there is often less clarity about who is responsible for what.

When team members feel like they are constantly being asked to do more than their fair share, it can lead to frustration and resentment.

And when team members feel like they’re not being given enough responsibility, it can lead to a feeling of being undervalued.

This lack of clarity about roles and responsibilities is a common source of conflict in virtual teams.

Time Zone Issue in Virtual Teams

Time Zone Issue

When you have team members working in different time zones, it can be difficult to find a balance that works for everyone.

Some team members may prefer to work early in the morning, while others may prefer to work late at night.

This can lead to conflict if team members are not respectful of each other’s preferences.

For example, if someone is constantly sending emails late at night, it can be disruptive for team members who are trying to wind down for the evening.

Or, if someone is regularly chiming into video calls during the early hours of the morning, it can be disruptive for team members who are just starting their day.

This time zone issue is a common source of conflict in virtual teams.

Personality Clashes

Just like in any team, there will always be some personality clashes. Some people are naturally more introverted, while others are more extroverted.

Some people prefer to communicate via email, while others prefer to communicate via chat.

These differences can lead to conflict if team members are not respectful of each other’s preferences.

Approaches to Conflict Resolution

Not-So-Great Approaches to Conflict Resolution

When it comes to conflict, there are generally two different approaches that people take:

The first is what’s known as the “avoidant” style. This is when someone tries to avoid the conflict altogether. They might do this by withholding information or by simply not engaging in the discussion.

The second approach is what’s known as the “confrontational” style.

This is when someone tries to address the conflict head-on. They might do this by being overly critical or by trying to dominate the conversation.

Neither of these approaches is ideal.

The avoidant style generally leads to more misunderstandings and resentment, while the confrontational style can often make the situation worse.

Poor Conflict Management Leads To More Conflict

If conflict is not managed properly, it can quickly escalate and lead to more conflict.

For example, if someone takes an avoidant approach to conflict and tries to withhold information, it might just make the other person more frustrated.

Or, if someone takes a confrontational approach to conflict and tries to dominate the conversation, it might just make the other person more defensive.

Neither of these approaches is ideal. The best way to manage conflict is to take a collaborative approach.

This means that both parties work together to find a resolution that works for everyone.

It’s also important to remember that conflict is not necessarily a bad thing.

In fact, conflict can often be a healthy part of a team dynamic. It can lead to new ideas and solutions that wouldn’t have been thought of otherwise.

The key is to manage conflict in a way that is constructive and respectful.

Managing Conflict In Virtual Teams

6 Tips For Managing Conflict In Virtual Teams

1. Address conflict early and directly.

The first step to effectively managing conflict is to address it early and directly.

Don’t let small disagreements fester; nip them in the bud before they have a chance to turn into full-blown arguments.

And don’t shy away from difficult conversations; the sooner you have them, the better.

Just be sure to approach these conversations with a collaborative mindset.

2. Reframe Goal Of All Conflict

Try to reframe the goal of conflict from “winning” to “finding a solution.”

When you approach conflict with the goal of finding a solution, it’s much easier to stay calm and constructive.

It’s kind of like when you’re trying to solve a puzzle.

If your only goal is to win, then you’re likely to get frustrated and give up easily.

But if your goal is simply to find the solution, then you’re much more likely to stay calm and keep working until you find it.

The same is true for conflict.

If your only goal is to “win,” then you’re likely to get defensive and escalate the situation.

But if your goal is to find a solution, then you’re much more likely to stay calm and collaborative.

3. Set Ground Rules For Your Team

Conflict resolution works best when there are established ground rules everyone agrees to follow.

These rules should be specific and relevant to your team’s situation; they might include things like “All disagreements must be addressed within 24 hours” or “All decisions will be made by consensus.”

Whatever rules you choose, make sure everyone understands and agrees to them before moving forward.

Some categories you might want to consider include:

  • How and when disagreements will be addressed
  • What kind of language is and is not acceptable
  • How decision-making will work

Encourage Open Communication

4. Encourage Open Communication

Open communication is essential for managing conflict effectively.

Encourage your team to share their thoughts and feelings openly, without fear of judgement or reprisal.

This doesn’t mean that team members should say whatever they want, whenever they want.

There still need to be ground rules in place (see tip 3).

But as long as those ground rules are respected, team members should feel free to share their thoughts and feelings openly.

5. Be Aware Of Cultural Differences

The online universe has made the world a bit smaller, but cultural differences still exist.

When managing conflict in a virtual team, it’s important to be aware of these differences and how they might affect the way team members communicate with each other.

For example, some cultures are more direct than others. This can lead to misunderstandings if not everyone is on the same page.

It’s also important to be aware of time differences. If team members are in different time zones, they might not be able to communicate as often as you’d like.

Keep these cultural differences in mind when managing conflict in a virtual team; they can help you avoid misunderstandings and miscommunication.

6. Seek Outside Help If Necessary

If you’ve tried everything and you’re still not sure how to resolve a particular conflict, don’t hesitate to seek outside help.

There are plenty of books, articles, and blog posts on the topic of conflict resolution. Do some research and see what advice other experts have to offer.

You can also talk to a trusted colleague or friend who might be able to offer some helpful insights. And if all else fails, you can always hire a professional mediator to help resolve the conflict.

Conflict is inevitable in any team, but it doesn’t have to be a bad thing.

By following these tips, you can turn conflict into an opportunity for growth and collaboration.

Virtual Team

Summary

While it’s impossible to avoid conflict altogether, following these tips should help you manage tension and disagreements in a virtual remote team.

By addressing issues early and directly, reframing the goal of conflict, setting ground rules, encouraging open communication, being aware of cultural differences, and seeking outside help when necessary, you can create a safe and productive work environment for everyone on your team.

We hope you’ve found this guide helpful. Be sure to come back and visit the Teamly blog for more great content like this. Thanks for reading!